 PARDESCO
How to Draw Sacred Geometry: Complete Step-by-Step Guide
To draw sacred geometry by hand, start with a compass set to one radius. Two equal circles make a Vesica Piscis. Adding five more around the same center gives the Seed of Life, and a second layer extends it into a 19-circle Flower of Life.
The instructions below give each compass position. Use a pencil first and keep the construction marks until you have checked the pattern. The circle grid works for these designs; forms with fivefold symmetry, such as a pentagram, need a different construction.
Tools and paper setup
- A compass that holds its opening while you turn it.
- A sharp pencil and a straightedge. The straightedge is for guide lines and the connections in Metatron's Cube.
- Paper with a firm backing. Draw lightly so repeated compass placements do not tear it.
- An eraser and a fine pen if you want to ink the finished drawing.
For a first attempt on A4 or US Letter paper, try a radius of 20 mm. Center the drawing on the sheet. The 19-circle Flower of Life will span 120 mm at that radius; the larger Fruit of Life construction below will span 200 mm, so use a 15 mm radius for that one if you want more margin.
You do not need a protractor. The equal-radius circle intersections establish the six directions.
Nine steps from two circles to the Seed of Life
Call the first center O and the compass radius r. Keep that opening unchanged through all nine steps. Label the six points on the first circle A through F as you work clockwise.
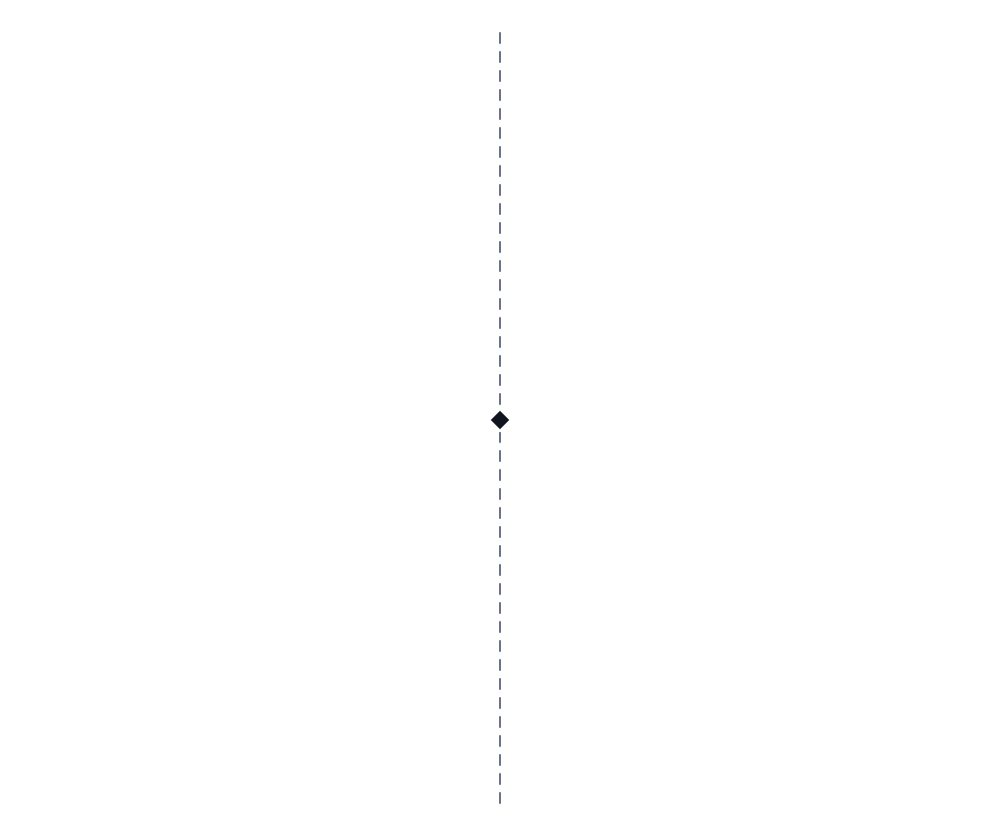
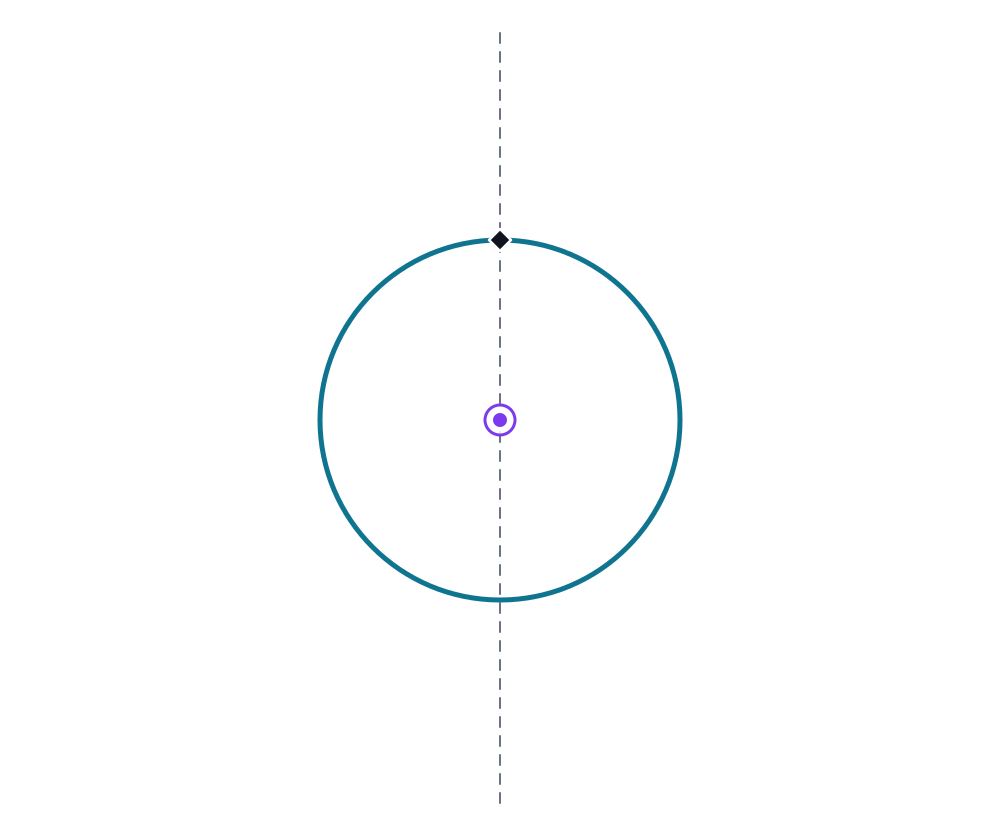
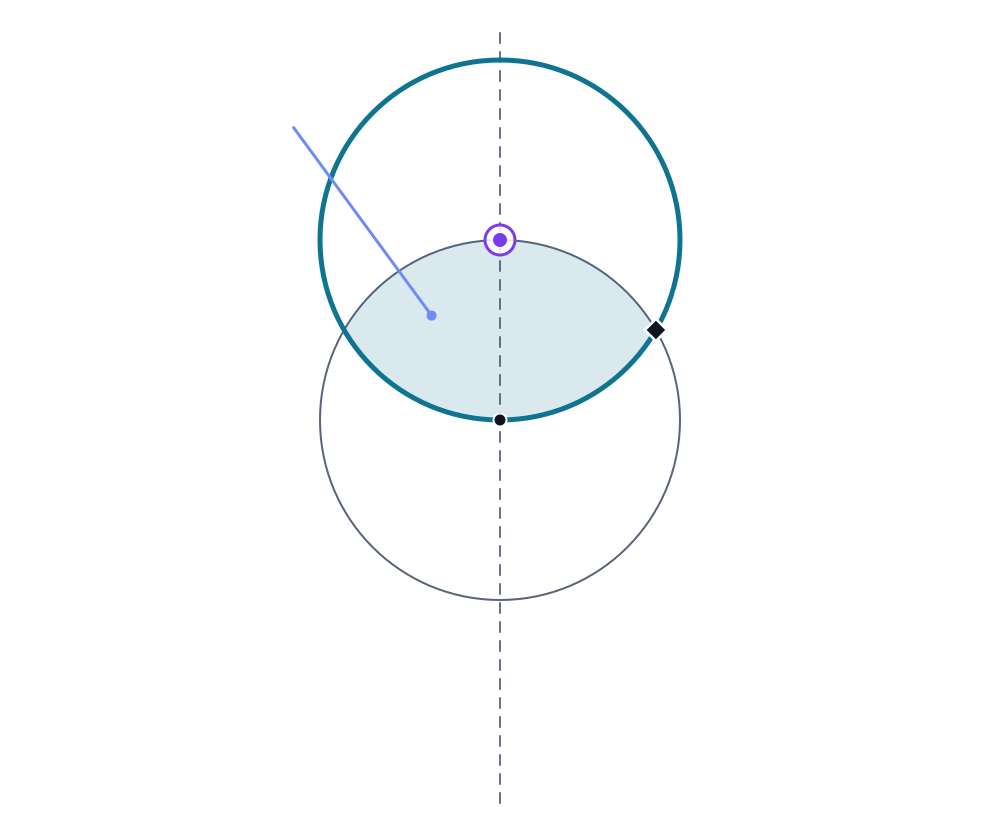
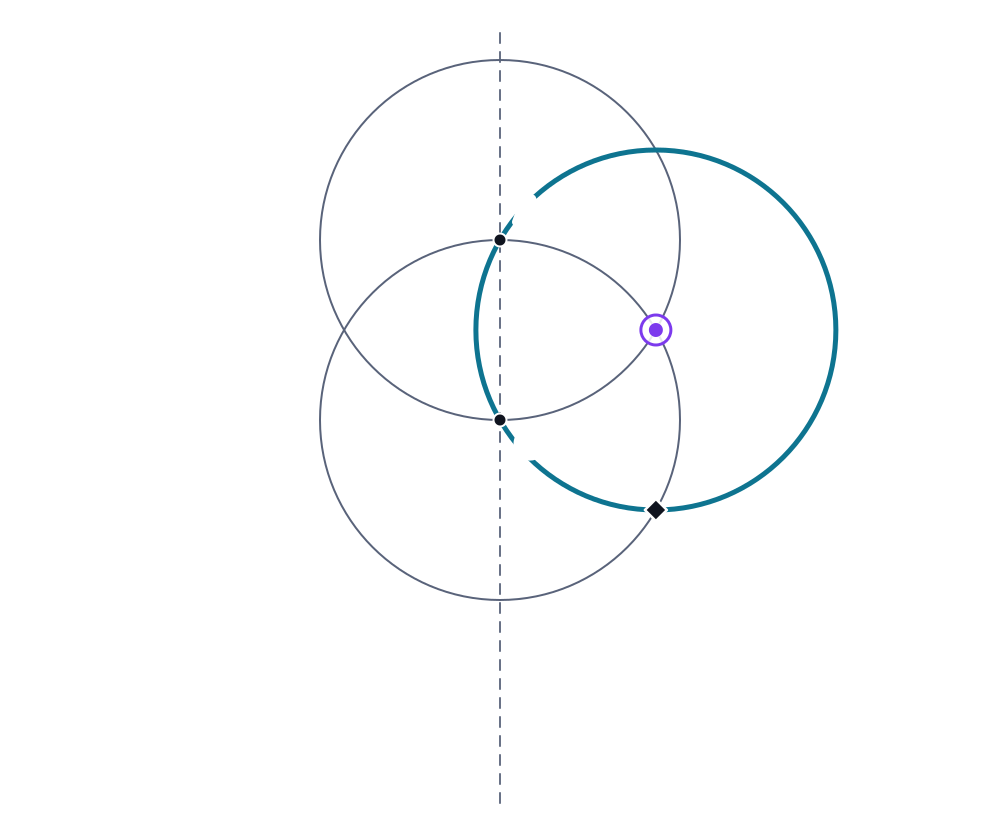
In the diagrams, teal marks the circle being added, violet rings mark the compass center, and dashed lines are construction guides. Click any diagram to enlarge it.
View all nine compass steps on one sheet
Step 1
Mark the center and a guide line
Put O near the middle of the sheet. Draw a faint vertical line through it, leaving room on every side for the pattern.
Enlarge diagram Step 2
Draw the first circle
Set the compass to r and draw a circle centered at O. Label the top intersection with the vertical guide A.
Enlarge diagram Step 3
Draw the second circle at A
Move the compass point to A without changing its opening. Draw a complete circle. Its overlap with the first circle is the Vesica Piscis. Label the right-hand intersection of the two circles B.
Enlarge diagram Step 4
Draw at B and locate C
Center the compass at B and draw another circle of radius r. It intersects the original O circle at A and at one new point farther clockwise. Label that new point C.
Enlarge diagram Step 5
Continue to D
Draw a circle of radius r at C. On the original O circle, its new intersection beyond B is D, directly below O.
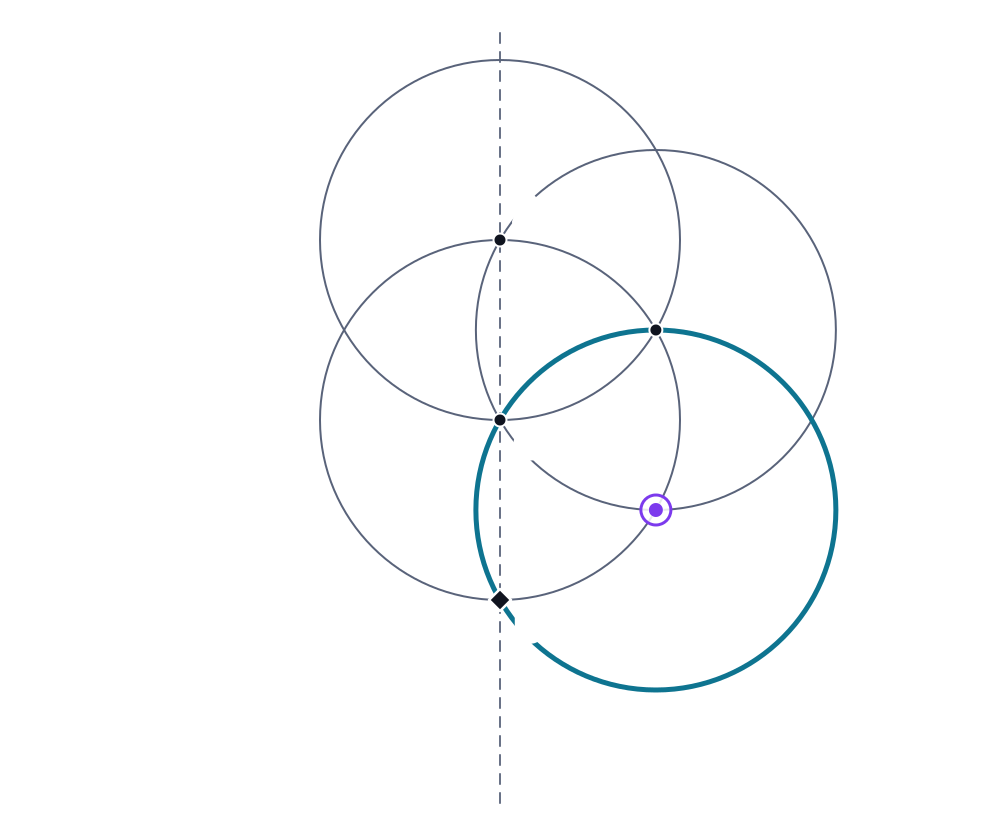
Enlarge diagram Step 6
Continue to E
Draw at D with the same radius. Its new intersection with the original circle, beyond C, is E on the lower-left side.
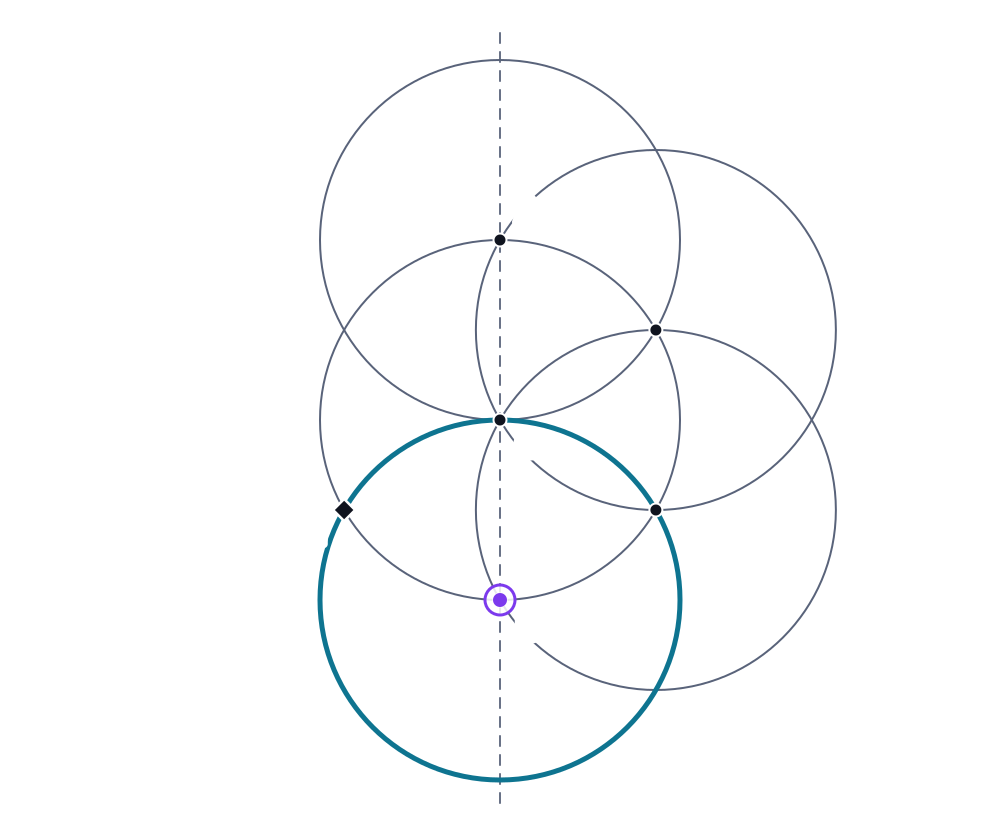
Enlarge diagram Step 7
Continue to F
Draw at E. Its new intersection with the original circle, beyond D, is F on the upper-left side.
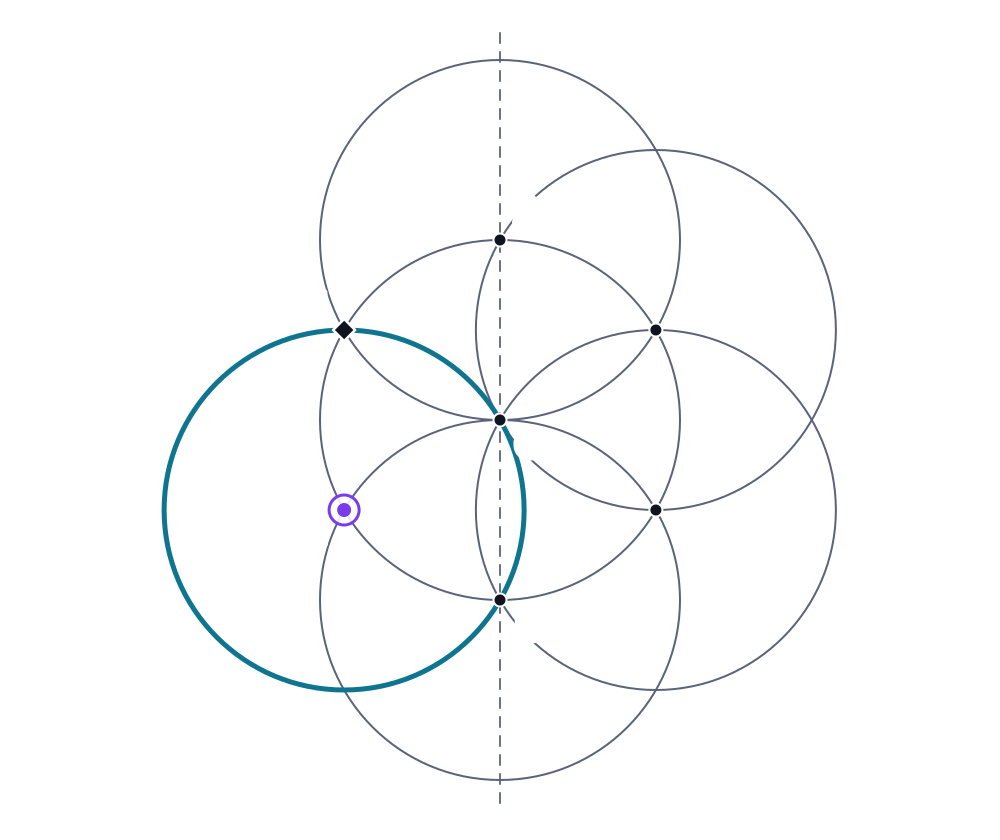
Enlarge diagram Step 8
Close the ring
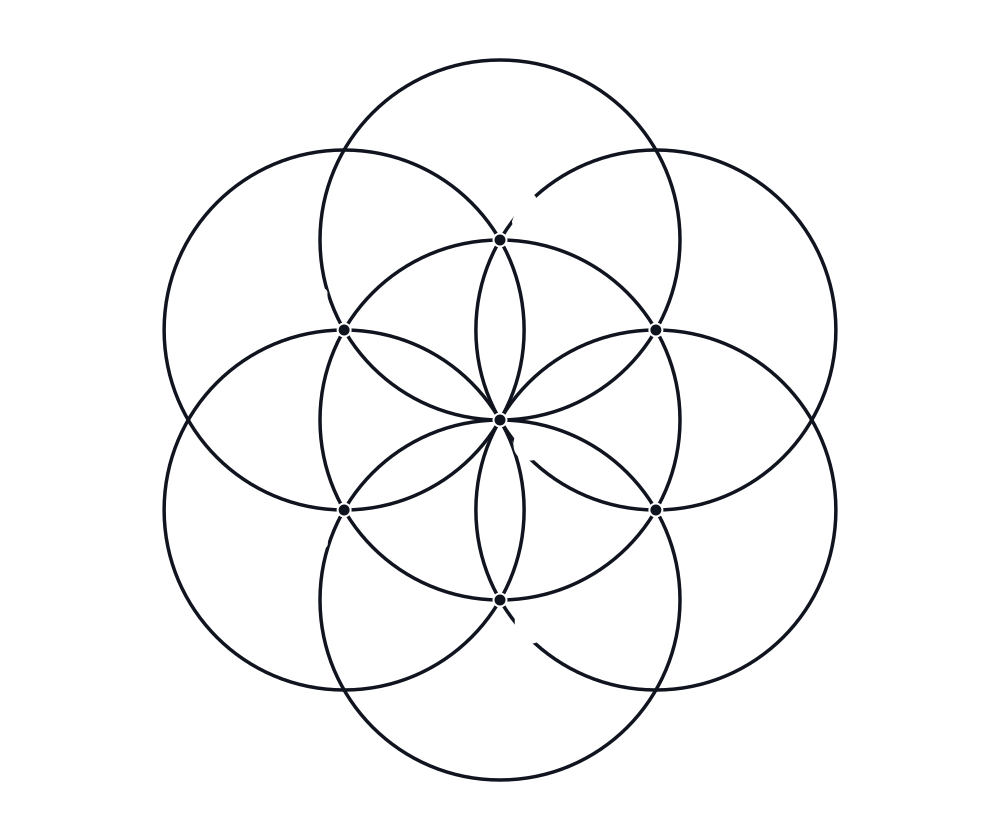
Draw the final circle at F. It should pass through A and E. You now have seven full circles: the one at O and the six centered at A, B, C, D, E, and F.
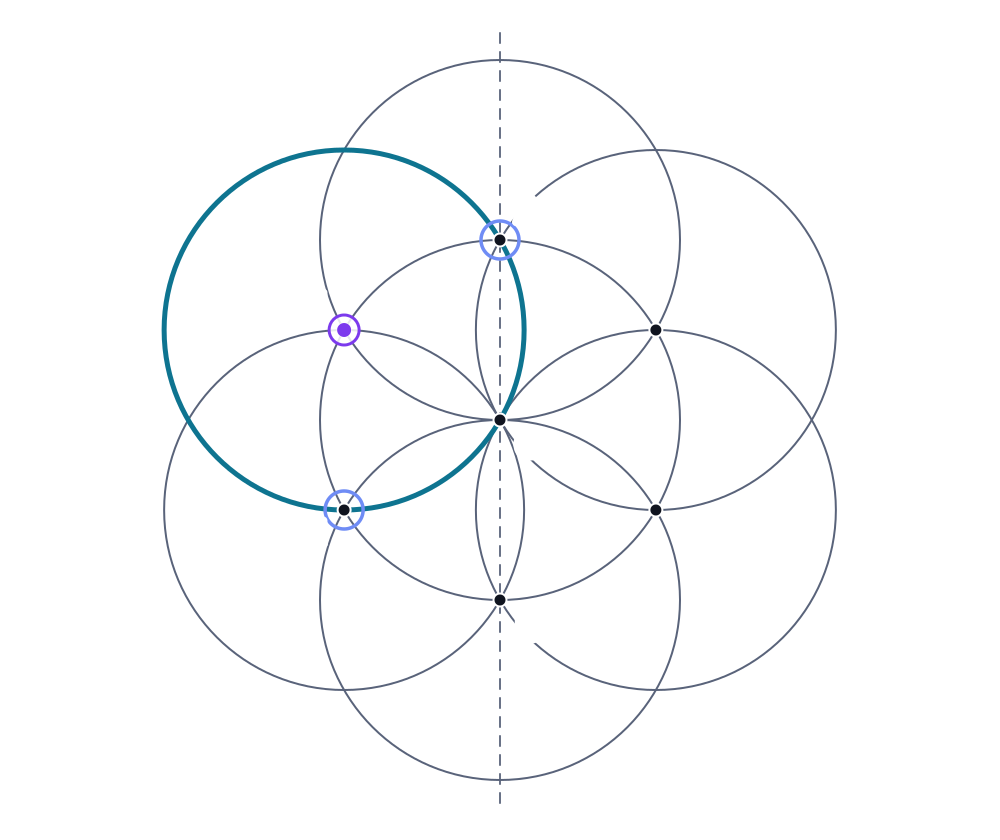
Enlarge diagram Step 9
Check before inking
Each outer circle should pass through O. The six outer centers should lie on the first circle and be one compass radius apart from their neighbors. If the pattern closes neatly, ink the circles you want to keep and erase the guide line after the ink dries.
Enlarge diagram
The seven-circle design is the Seed of Life. The compass stepping uses the same geometry as inscribing a regular hexagon in a circle. You can join A through F with a straightedge to see that hexagon.
Extend the Seed of Life into a Flower of Life
Keep the seven circles and their center labels. You need twelve new centers, all outside the original O circle. Keep r unchanged when drawing each new circle.
View the complete construction on one sheet
Step 1
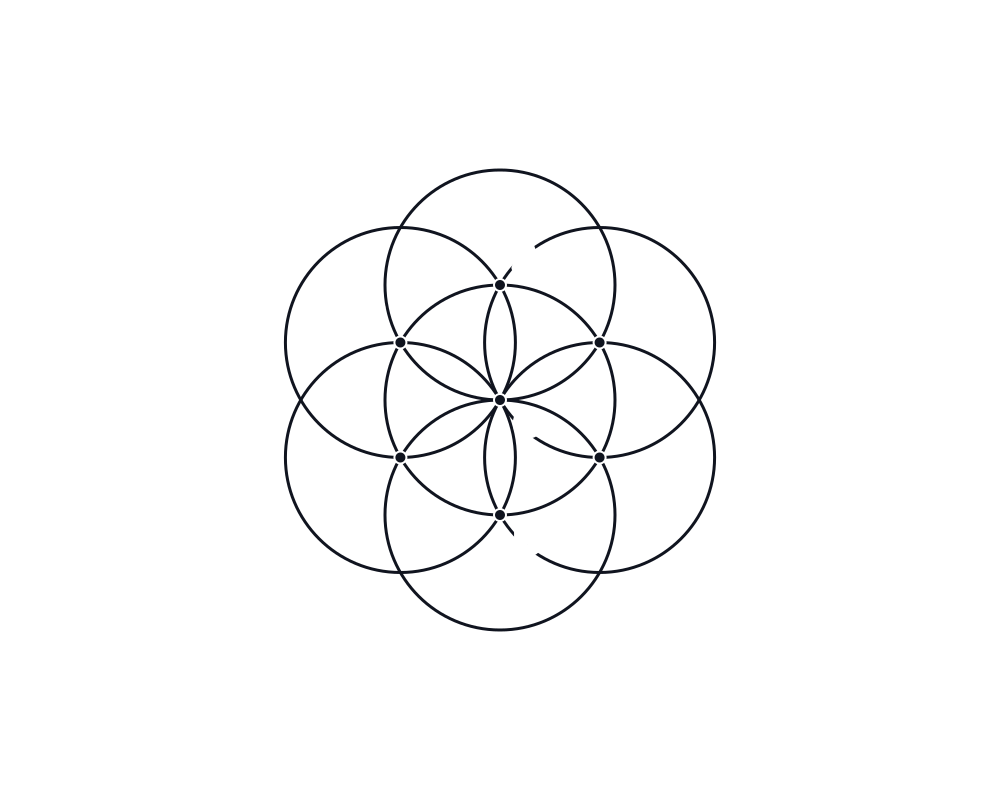
Start with seven circles
Keep the Seed of Life with center O and outer centers A through F. Keep r unchanged for each new circle.
Enlarge diagram Step 2
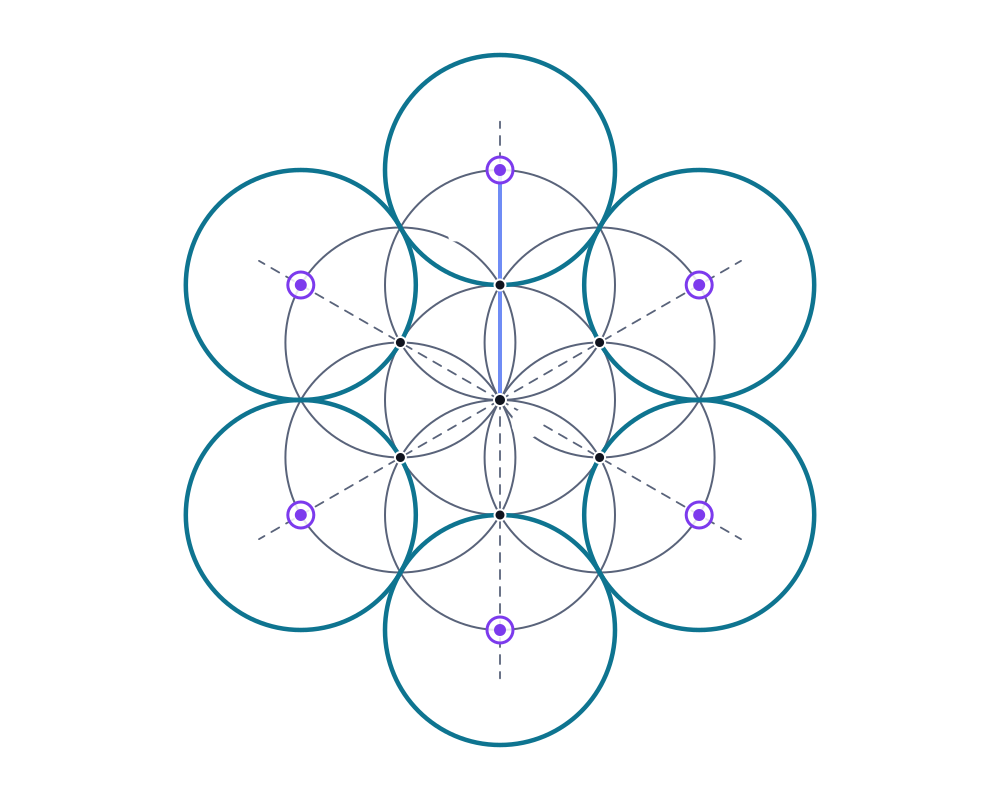
Add six circles along the rays
Draw faint lines from O through A, B, C, D, E, and F. On each line, mark the farthest intersection with the circle centered at that letter. Each new point is 2r from O. Draw a circle of radius r at each of these six points.
Enlarge diagram Step 3
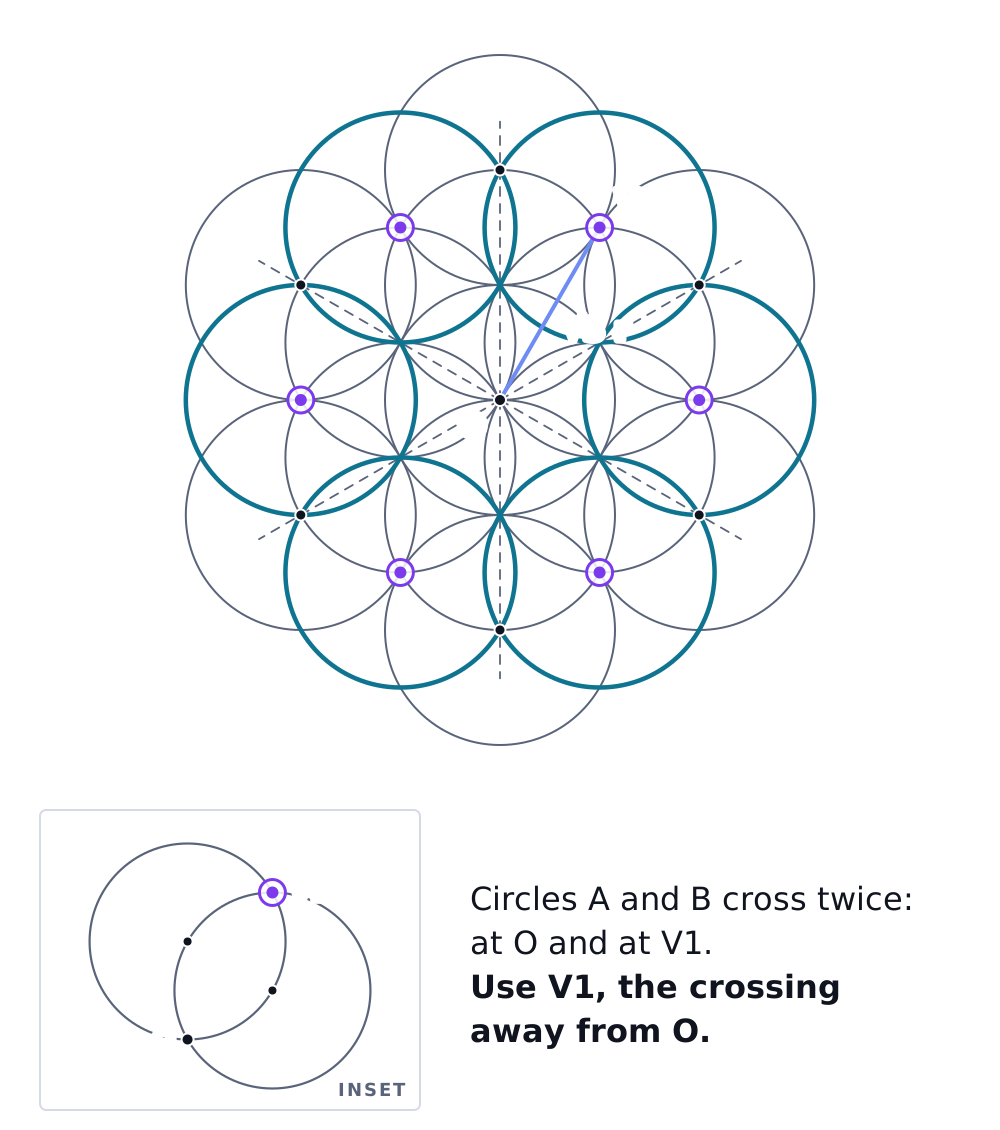
Add six circles between the rays
The circles centered at A and B meet at O and at a second point outside the original circle. Mark that second point. Repeat for B and C, C and D, D and E, E and F, then F and A. Draw a circle of radius r at each of those six between-ray points.
Enlarge diagram Step 4
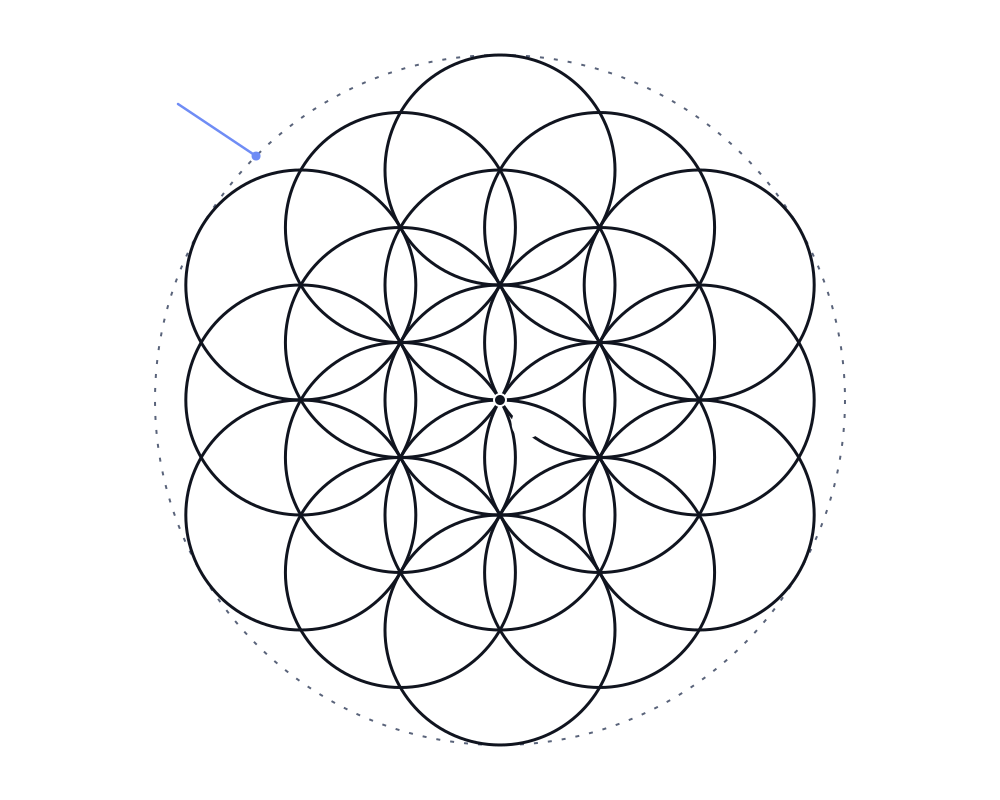
Count nineteen circles
Count 1 central + 6 in the first layer + 12 in the second layer = 19. If you want an outer boundary, draw one centered at O with radius 3r. It touches the outermost circles and is separate from the count of 19 equal circles.
Enlarge diagram
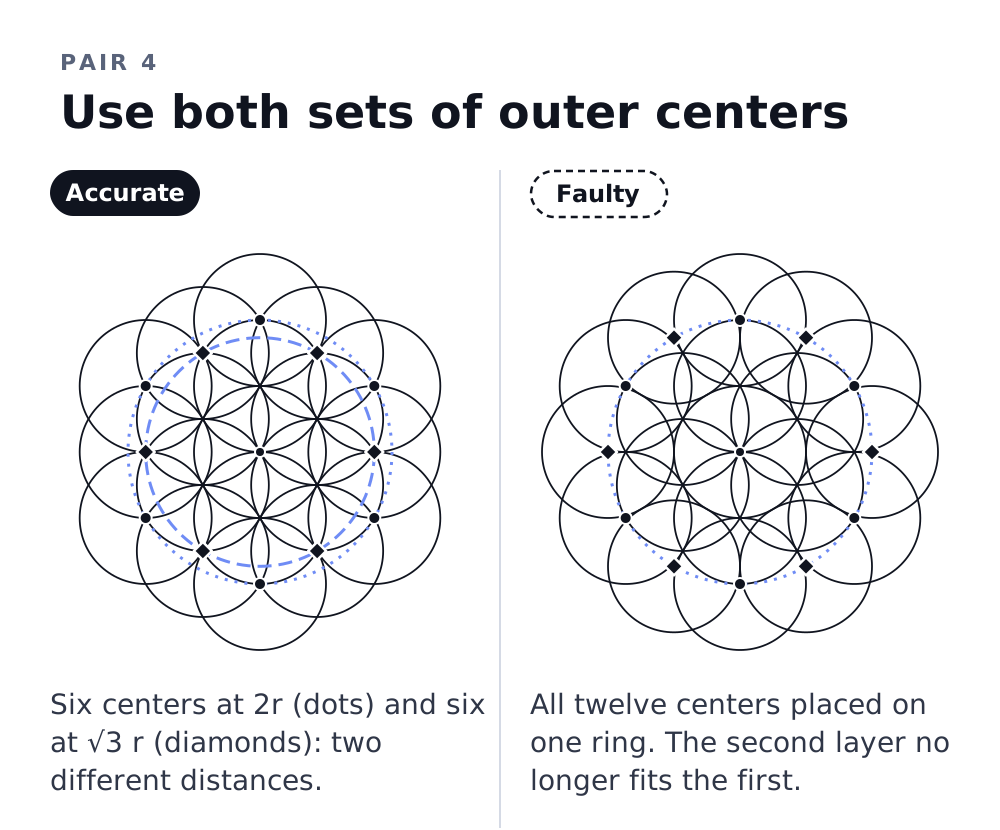
The second layer is not a set of twelve centers equally spaced on one large circle. Six lie 2r from O; the other six lie closer to O, at √3r. Using the actual intersections prevents the pattern from drifting.
Read about the Flower of Life or compare the symbols and their meanings.
Draw the Fruit of Life and Metatron's Cube
Start on a fresh sheet or use a very light extended grid. This construction is larger than the 19-circle Flower of Life. Use O and the same six rays through A to F.
View the complete construction on one sheet
Step 1
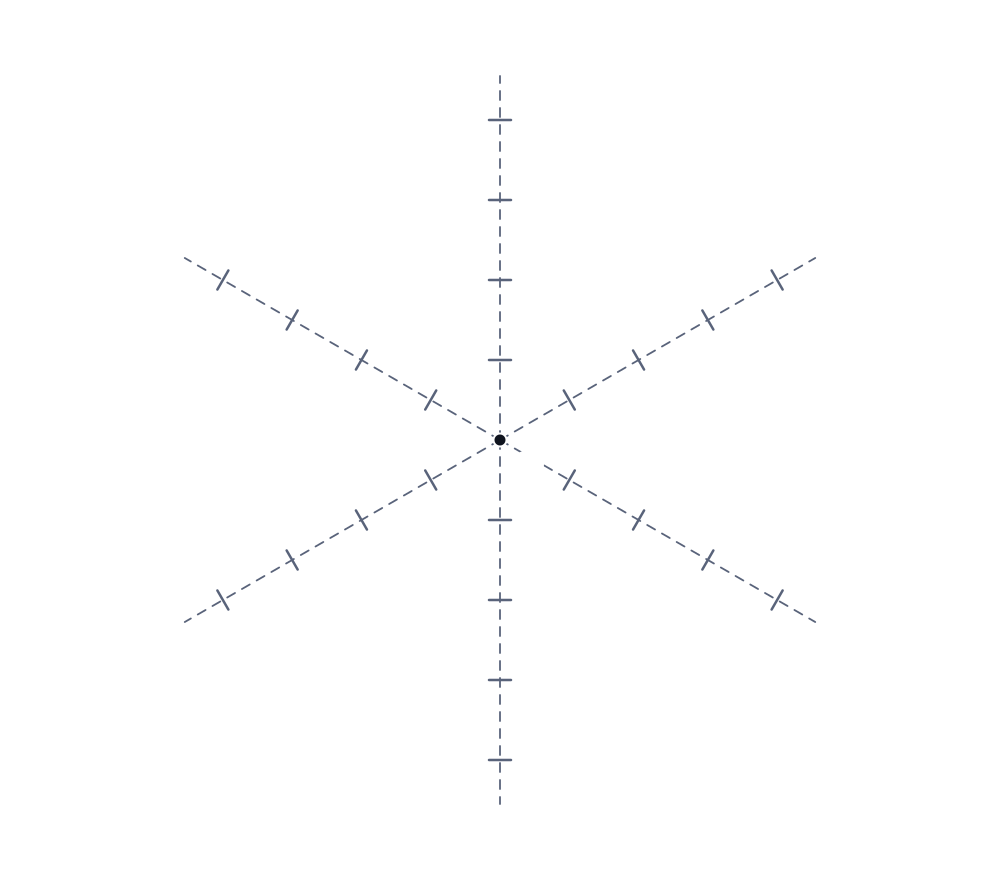
Mark distances along six rays
With the compass set to r, step outward along each ray from O. Mark positions at r, 2r, 3r, and 4r. The straightedge keeps the marks on the ray; the compass transfers the distance.
Enlarge diagram Step 2
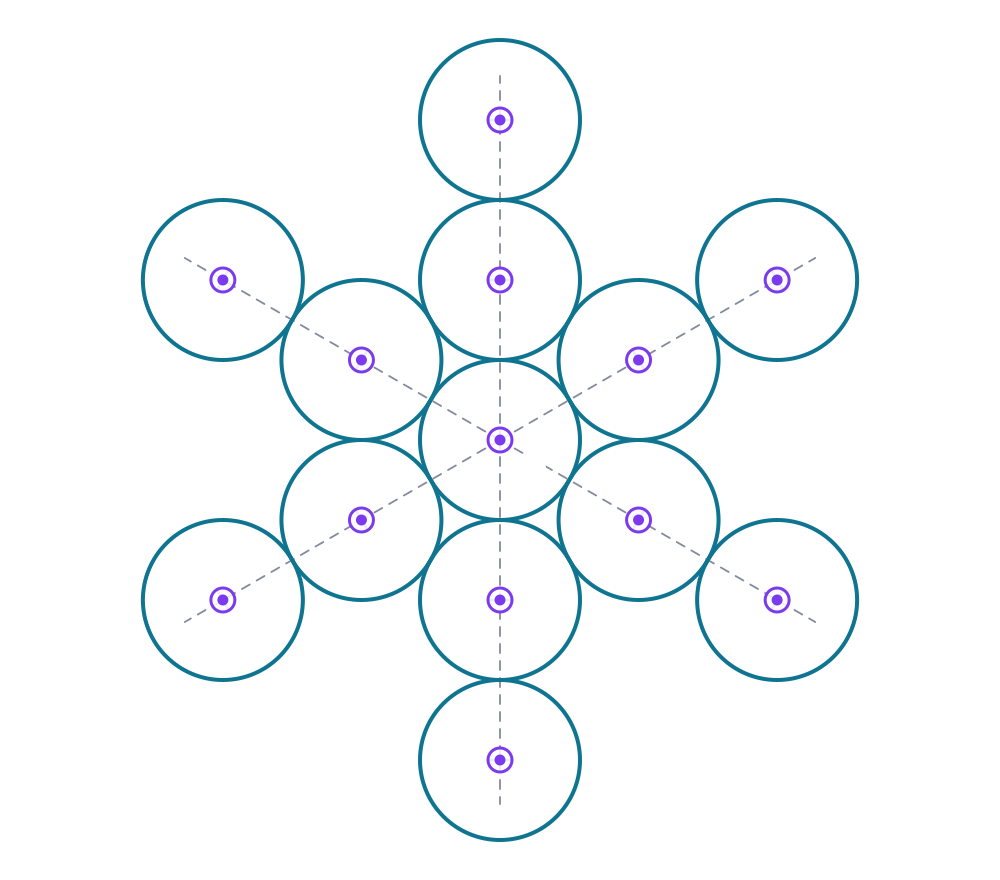
Draw the thirteen Fruit of Life circles
Select O plus the 2r and 4r marks on each of the six rays. That gives 1 + 6 + 6 = 13 centers. Draw a circle of radius r around each selected center. Keep the other construction marks light.
Enlarge diagram Step 3
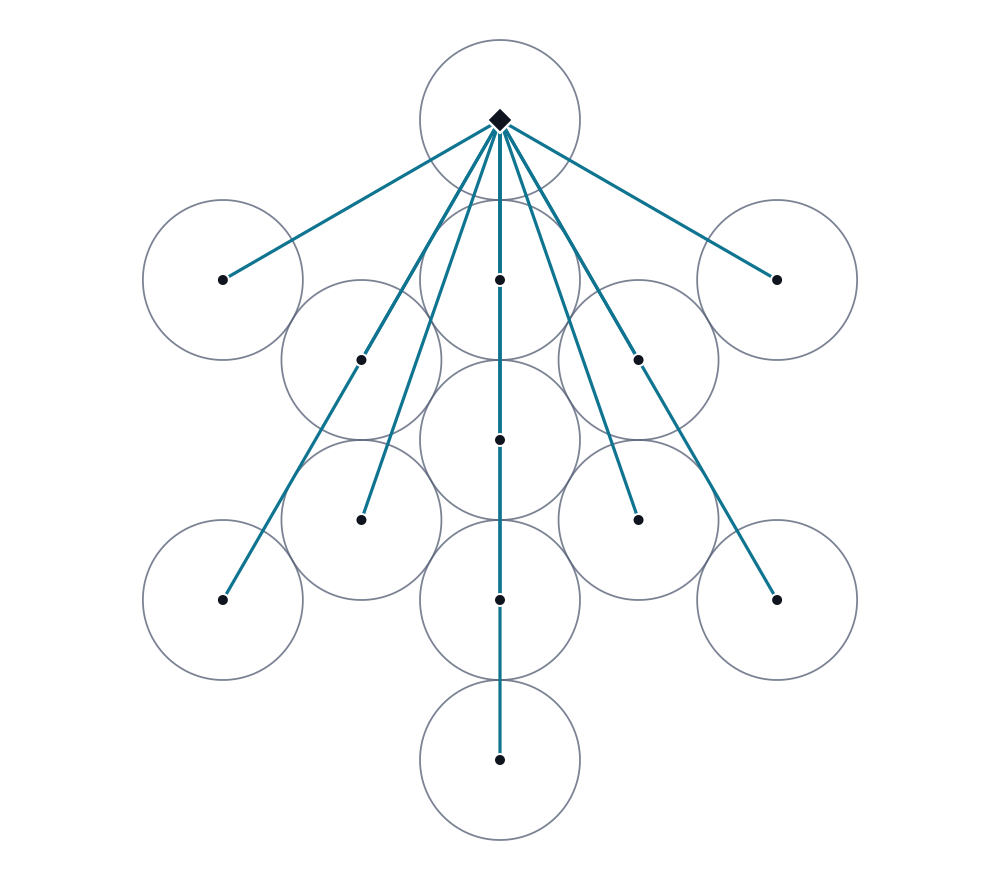
Connect one center to the other twelve
Choose one center and use a straightedge to join it to each of the other twelve centers. The diagram shows one set of connections before the full network is added.
Enlarge diagram Step 4
Connect every pair
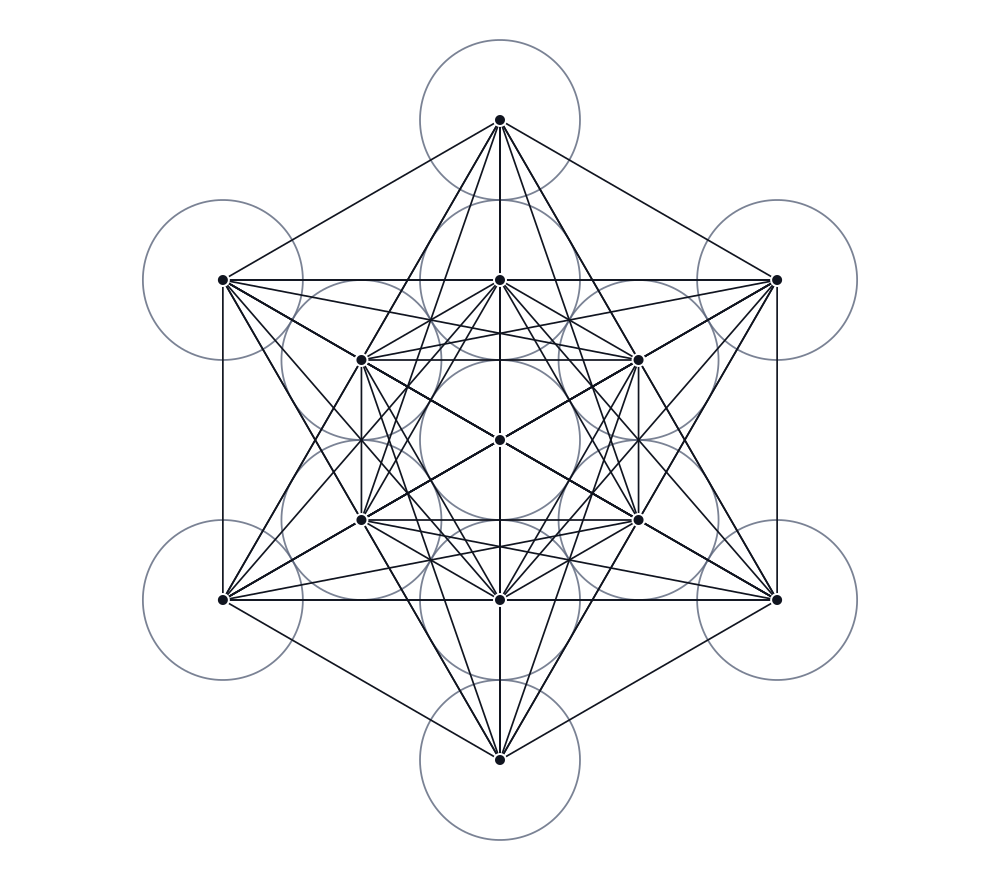
Repeat for the remaining centers, keeping a numbered list so you do not miss a pair or redraw a connection. There are 13 × 12 ÷ 2 = 78 pairwise connections; some lie along the same straight lines and overlap. This network forms Metatron's Cube.
Enlarge diagram
Decide whether to retain the circles, the straight-line network, or both before inking. The picture suggests projected solids, but a resemblance alone does not establish the exact proportions of every Platonic solid. Our Metatron's Cube guide discusses the form.
When the pattern does not line up
View all four drawing checks on one sheet
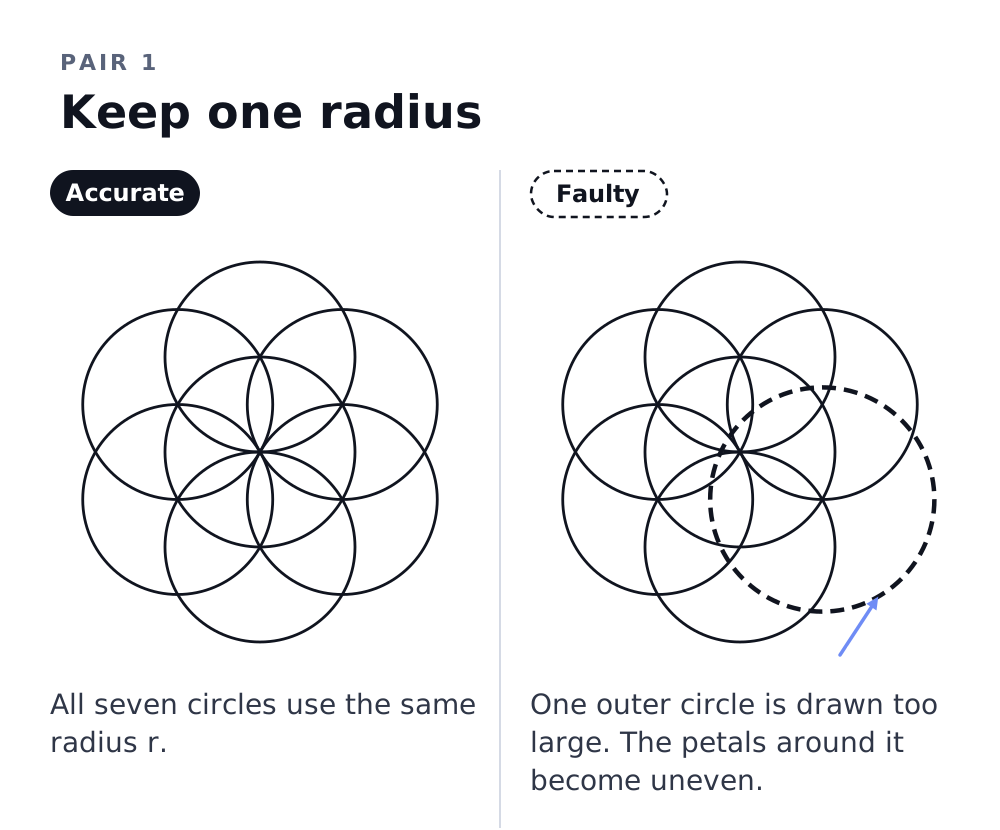
Keep one radius
Every small circle should use radius r. A larger outer circle makes the surrounding petals uneven.
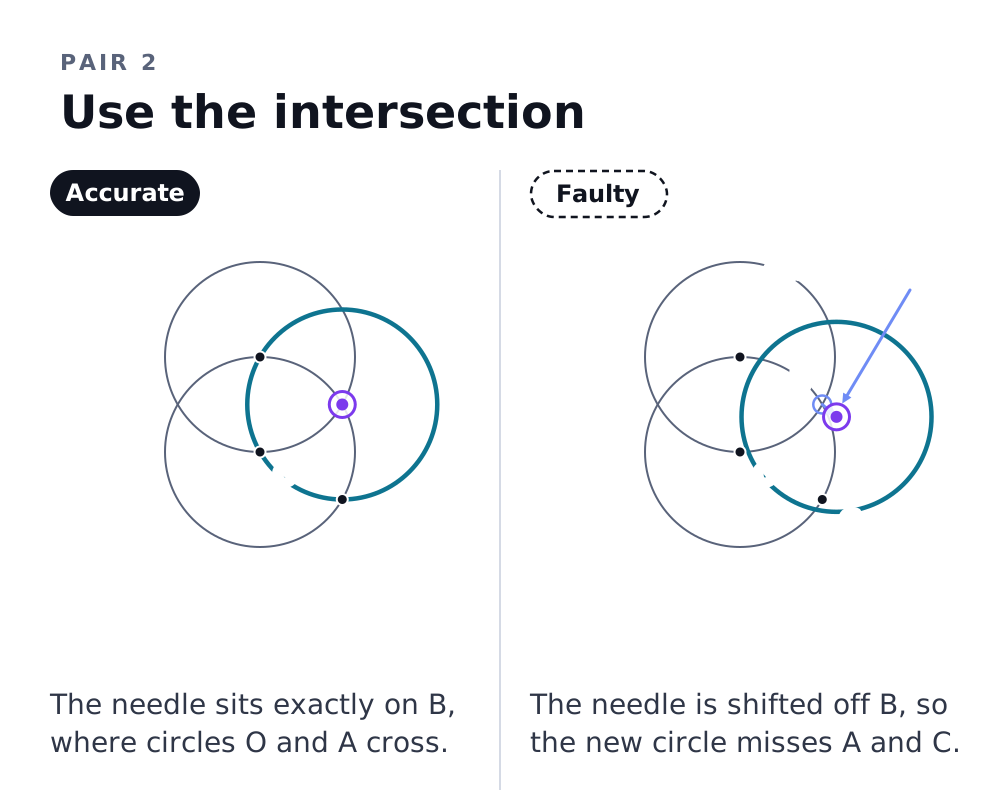
Place the needle on the intersection
Use the exact crossing at B. A small shift moves the new circle away from A and C.
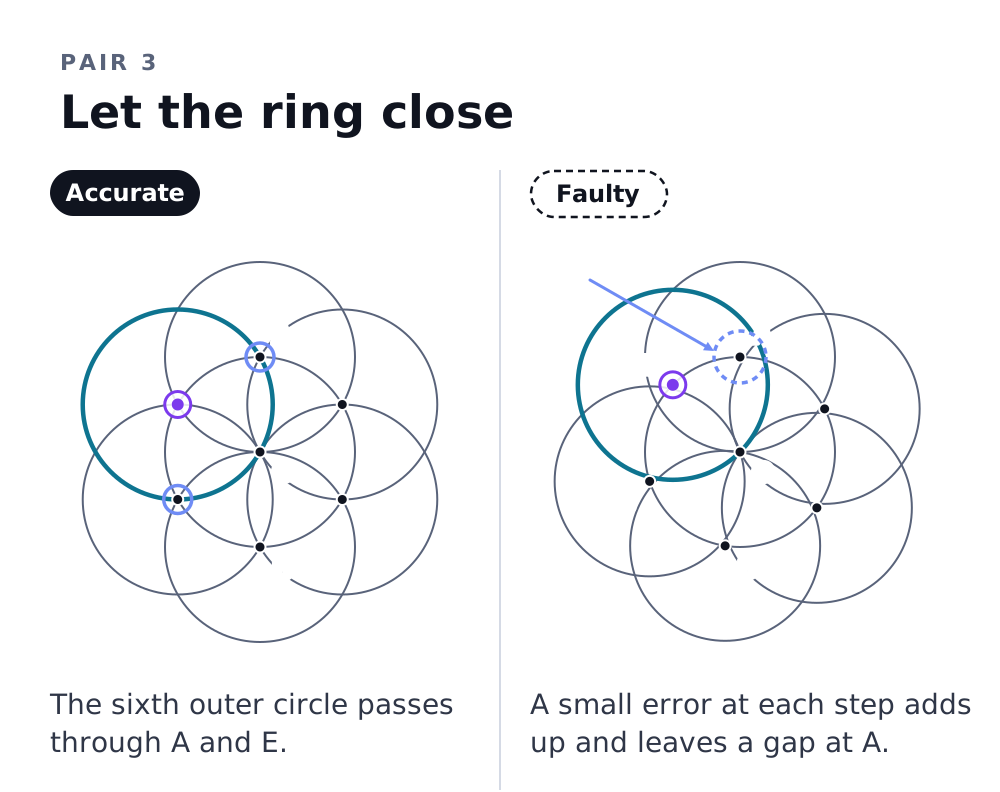
Check that the ring closes
The final circle centered at F should pass through A and E. A gap is a reason to recheck your compass setting and earlier placements.
Use both sets of outer centers
The Flower of Life adds six centers at 2r and six at the square root of 3 times r. Putting all twelve on one ring changes the pattern.
| What you see | What to check |
|---|---|
| The last circle misses the first point. | The compass opening may have changed, or small placement errors have accumulated. Redo the six marks on the original circle before adding detail. |
| Petals have different widths. | Use the same radius for every small circle. Place the compass needle on the intersection itself, not the edge of a thick pencil stroke. |
| The Flower of Life looks stretched. | Check that the twelve new centers come from the two sets described above. They do not all sit at the same distance from O. |
| The center becomes a dark patch. | Keep the construction light and avoid retracing overlapping line segments while inking Metatron's Cube. |
Once the construction closes, try filling alternating regions, changing line weight, or repeating the design as a border. Choose colors for the contrast and rhythm you want in the drawing.
Print the guide and keep practicing
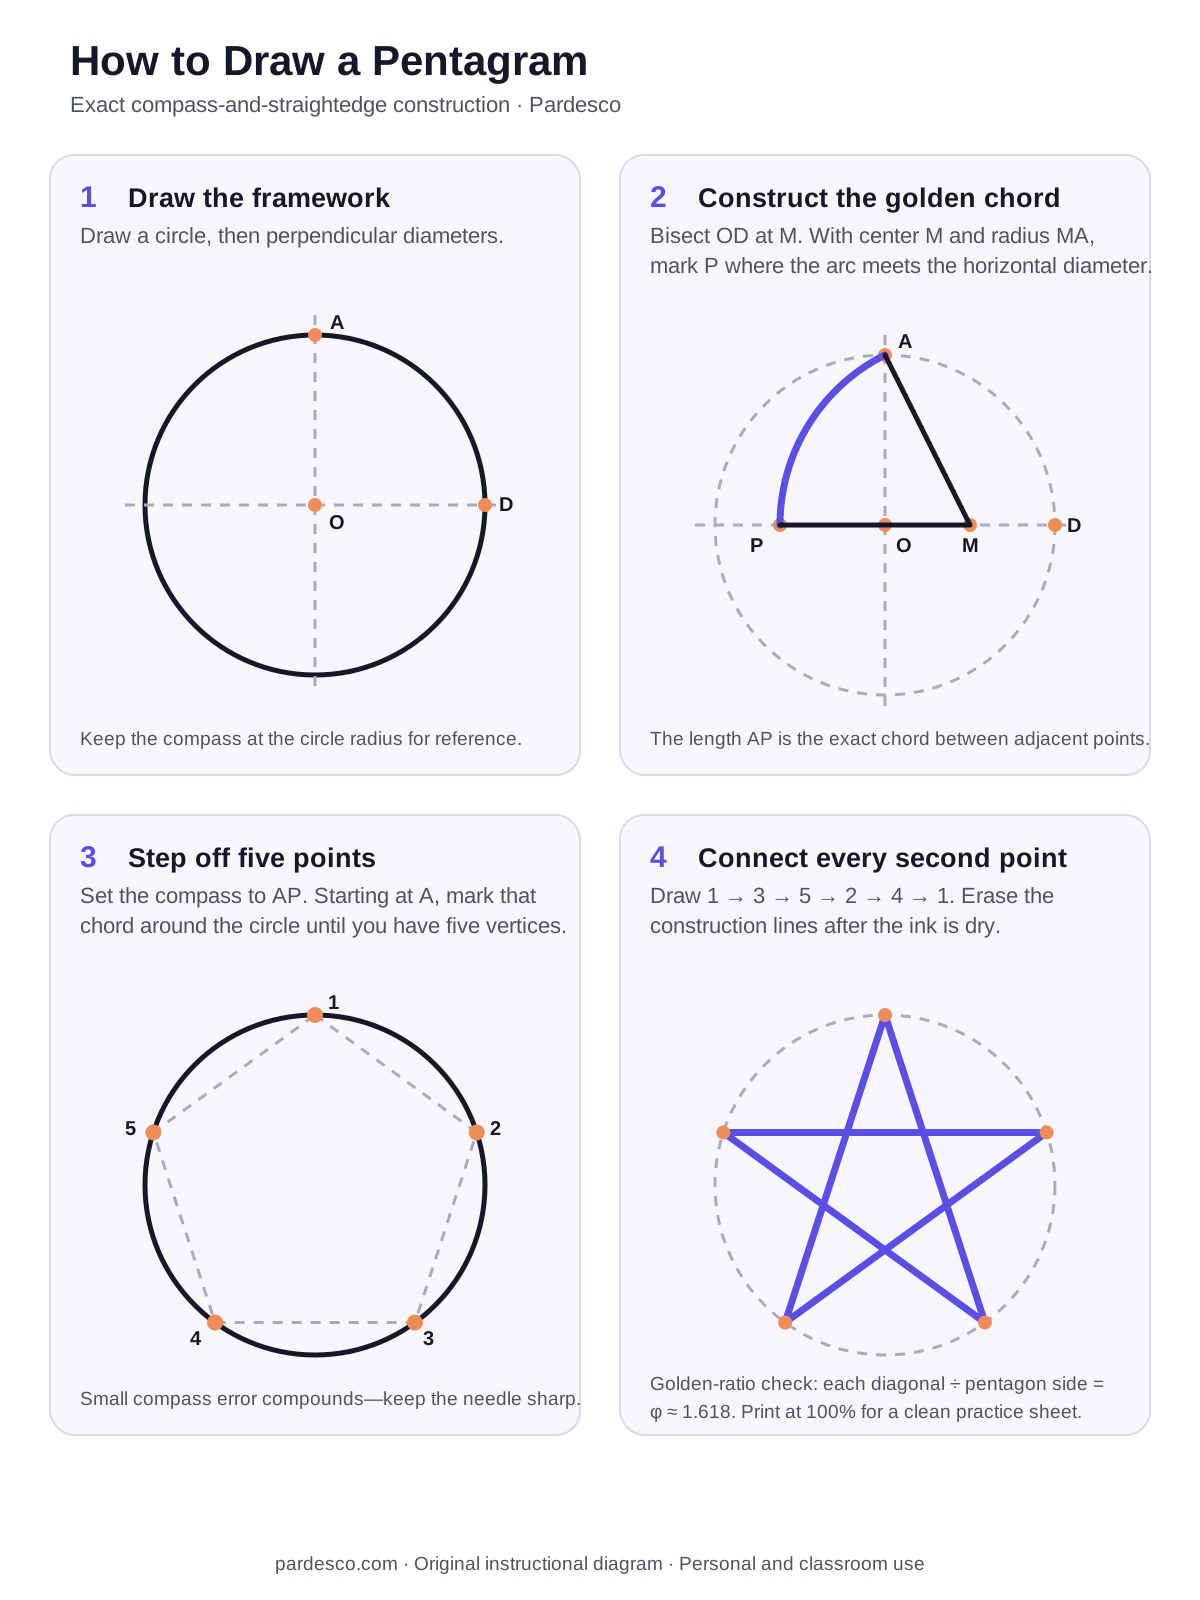
Download the free four-page sacred geometry drawing reference for the four illustrated construction sheets. To save the complete article as well, open your browser's Print command and choose “Save as PDF.” For a separate fivefold construction, use our pentagram tutorial and its free printable sheet.
The free Mandala Maker lets you experiment with symmetry and export patterns in your browser. It is a design tool, so its presets do not replace the compass instructions above. Find more experiments on the tools page.
For numbered constructions and practice pages, our Drawing Sacred Geometry workbook is a separate 38-page paid PDF.
Frequently asked questions
What tools do I need to draw sacred geometry?
For the basic circle patterns, use a compass, pencil, paper, and a straightedge. An eraser and fine pen are useful for cleaning up and inking the finished design.
Can beginners draw sacred geometry?
Yes. Begin with two equal circles to draw the Vesica Piscis, then build the seven-circle Seed of Life. Light construction lines make errors easier to correct.
What is the Sacred Grid Method?
On this page, it means a triangular lattice of circle centers with sixfold symmetry. It supports the circle patterns shown here; other symbols, such as a pentagram or Sri Yantra, need different constructions.
How long does it take to learn sacred geometry drawing?
There is no fixed learning time. Start with the two-circle construction and move on when you can repeat it with a steady compass radius. The larger patterns take more placement and checking.
Is drawing sacred geometry a form of meditation?
Some people find the repeated drawing process contemplative. You can use it as a focus for attention, but the construction does not establish claims about synchronizing brain hemispheres.
How many circles are in the Flower of Life?
The version in this guide has 19 complete circles of the same radius: one in the center, six in the first layer, and twelve in the second. Decorative boundary circles are additional.
Is there a sacred geometry drawing PDF?
Yes. Download the free four-page drawing reference linked in this guide. It includes the Seed of Life, Flower of Life, Fruit of Life and Metatron's Cube, plus drawing checks. Our separate paid Drawing Sacred Geometry workbook has 38 pages of instructions and practice pages.
Why does my Seed of Life not line up?
Check that the compass opening stayed fixed and that each new center is on the original circle. Small errors accumulate as you step around it. If the last point misses the first, redo the marks before inking.
Studio dispatches
New work, new writing — straight to you
Occasional letters from the studio. No spam, unsubscribe anytime.