 PARDESCO
AI 3D Modeling for 3D Printing: What Works in My Blender Workflow
AI can help you model objects for 3D printing, but the method matters more than the tool. Text-to-3D and image-to-3D generators make a mesh in a minute. Asking an AI to write the code that builds the model is slower to set up, and it is the method behind nearly everything I have printed.
I design in Blender with an AI agent that can see the scene, run Python and render previews, and I print on a Bambu Lab P2S. This article covers what each method is good for, the checks I run before slicing, where AI slicing advice has helped me and where it has been wrong, and one project from the first brief to the reprint.
Where AI fits in the print pipeline
A print goes through five stages: idea, model, check, slice, print and iterate. AI is useful at every stage and fully trustworthy at none of them. This is the split I have seen across my own projects.
| Stage | What AI does well | Where it has failed me |
|---|---|---|
| Idea | Quick concept meshes and silhouettes to react to | Taste. A form can be mathematically consistent and still look crowded. |
| Model | Writing generator code from a brief in millimetres; maths-heavy geometry | Plausible scripts with real geometry bugs, such as a duplicated ring that left 720 zero-area faces in every exported cap |
| Check | Writing watertight, overhang and clearance checks that run on every build | A mesh that passed in memory but opened in the slicer as triangle soup |
| Slice | A starting profile, reading slicer warnings, painting supports into a file | A setting from a different slicer, an overstated infill, a time estimate more than two hours short |
| Print and iterate | Turning my description of a problem into a design change | Physical judgment: how a piece sits, whether a stand will hold, what looks chopped off |
The rule I work by: the agent proposes and I decide, with a render, a slice or a test print as the evidence.
Text-to-3D and image-to-3D: what came out
Text-to-3D and image-to-3D generators turn a prompt or a picture into a textured mesh. I pay for Tripo and have tested its exports as a source for production models. The lesson from that test applies to any generator: judge the mesh with a plain clay render before anything else, because the textured preview hides what the geometry is doing.
My test was a futuristic tower for a 3D city scene. Textured, it looked like detailed architecture. With a grey clay material it was a smooth, melted lump. Every panel line, window and setback was painted into the normal map rather than modelled, and 78% of its quads were non-planar. Decimating, remeshing or retopologising just re-wrapped the same lump. It also came back at roughly 1:1.6 proportions when I had asked for 1:4, and as a single mesh with a single material.
For printing this matters even more than on screen. A printer only sees geometry. Detail that lives in a normal map simply disappears, and what is left is the lump. The other problems to check on any generated mesh:
- Non-manifold or open geometry. Holes, internal faces and edges shared by more than two faces confuse the slicer.
- Thin walls and spikes narrower than your nozzle can lay down. On a 0.4 mm nozzle, anything thinner than about two line widths is fragile or missing.
- Scale. Generators have no idea how big the object is meant to be. Set real dimensions before you judge anything.
- Proportions. Check them against your brief; they drift.
My verdict: generators are useful for concepts and silhouettes, never as a drop-in model. My process is to generate, screenshot the result as a reference, and then build the real object to spec. I have not sold a print made from raw generator output, and I would not without rebuilding it.
AI-written generators: my main method
This is where AI earns its place in my work. Instead of asking for a model, I describe the object and its constraints, and the agent writes a Python script that builds it. The script is the design. I can change one number and regenerate, keep every version, and rebuild any file exactly.
A brief covers the intent, the dimensions in millimetres and the physical limits: a 256 mm bed, a 0.4 mm nozzle, a 45° overhang limit, minimum gaps where supports have to come out, and the output formats. The scripts use numpy for the maths and trimesh and manifold3d for clean, solid meshes, with Blender for renders. I don't use OpenSCAD or CadQuery; Python covers what I need.
Each design gets its own folder with a short note, the generator, a print_ready folder and the renders, so I can always see why a decision was made.
Some examples from my geometric work:
- The six regular polychora as prints. The 4D maths from my Blender add-on projects each shape into 3D, and the generator turns the edges into printable tubes. The 600-cell's standard projection crushed its centre to a 0.85 mm gap, too tight to print or clean. Projecting it vertex-first instead opened that gap to 6.57 mm.
- Relief vessels with overhang limits built in. On one urn design, the generator raised 9.2% of the surface so that no slope exceeded 44°, which lets it print without supports.
- Interlocking pieces. The Borromean rings keep a 5.8 mm gap between rings so they can print in place. The torus knots keep a 3 mm gap between strands so supports can be pulled out.
- A 10 × 10 inch Penrose wall panel sized at 254 mm to fit the P2S bed with a millimetre to spare.
I direct the geometry and review every result. A script that runs without errors can still make the wrong object, so nothing goes to the slicer on the strength of the code alone.
The agent inside Blender
The agent connects to Blender over MCP, a protocol that lets it inspect the scene, run Python and render a preview without me copying anything back and forth. That turns the work into a loop: describe, build, render, critique, revise, check.
Live MCP is best for inspecting objects and quick test renders. For long jobs I have the agent save a copy of the scene and render from the command line in the background, because long calls over the live connection time out. Either way the agent looks at its own render before showing me, and I ask for a clay version whenever surface detail matters.
Printability checks before slicing
Every generator runs the same checks on every build, and the agent writes and maintains them:
- watertight, with no open or non-manifold edges
- no degenerate (zero-area) faces
- one solid body, with the number of holes the design should have
- overhangs under the limit, measured on the surface
- minimum gaps and wall thicknesses where the design needs them
The most useful lesson came from a failure. I opened a vase plate in Bambu Studio and got an error and a warning: millions of open edges, an empty first layer and a floating cantilever. The mesh had passed every check in memory, but the plate export had skipped merging duplicate vertices, so the file was a loose soup of triangles. The agent's own diagnosis was "that was my mistake". It re-exported, and I now re-check the exported file after reloading it, not just the mesh in memory.
Where I trust the slicer preview over any check: support placement, the first layer, and the final time and weight. When Bambu Studio warns that a model has over a million triangles and offers to simplify, I decline on detailed pieces, because simplifying rounds off sharp tips.
Slicing and print settings: help and mistakes
AI is a good partner for a first profile and for reading what the slicer is telling you. It is also confidently wrong often enough that I check every suggestion. Real examples from my prints:
- A setting that doesn't exist. It told me to set the seam to "sharpest corner". I couldn't find it, because that is a Cura setting. Bambu Studio names its seam options differently.
- Overstated infill. It recommended 100% infill for a small display stand. When I asked whether that was really needed, it agreed it had overstated the gain.
- Estimates are guesses. For a pet urn it estimated about 145 g and 8 hours with four walls. The real slice was 180 g and 10 h 47 min. I went with three walls: 171.8 g and 8 h 48 min.
- Supports painted into the file. This one worked well. The agent wrote support enforcers directly into a 3MF so only one inside pocket gets supports. Bambu Studio's default automatic tree supports used 13.7 g on that urn; with the painted supports and manual mode it was 2.2 g.
- Command-line slicing for quick numbers. The agent can slice through Bambu Studio's command line to get weight and time for pricing. Weight came within about 5% of the app. Time did not: 7 h 18 min against 11 h 20 min in the app for my Penrose panel. I treat command-line times as a minimum and price from the app's slice.
Most of my troubleshooting so far has come from describing what I see rather than sending photos. When the 24-cell's corner stand turned out flimsy and fell over at a light touch, I suggested seating the model on a face instead, and the agent redesigned the stands around that. The diagnosis was mine; the agent did the geometry.
Build log: the 60 mm tesseract
The tesseract, a 4D hypercube projected into 3D, was my first print on the P2S, in September 2026. It shows the whole loop, including the part where I overruled the design.
The brief
A 60 mm perspective projection of the tesseract, printable in PLA on the P2S, with tubes thick enough to survive handling and gaps wide enough to clean supports out.
The model
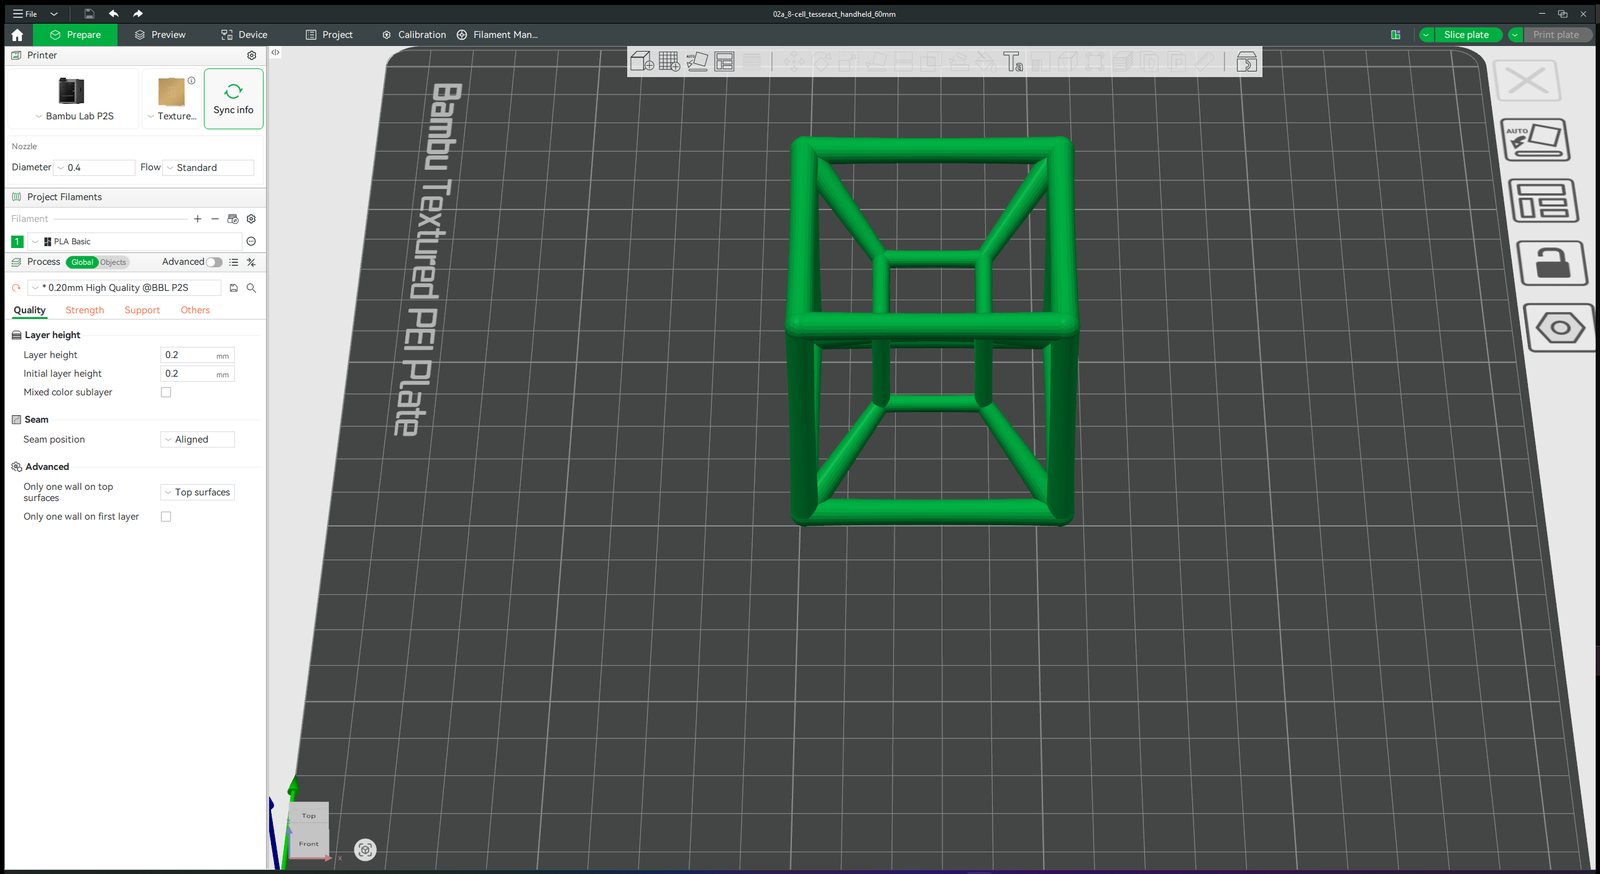
The generator reused the projection maths from my 4D add-on, turned the 32 edges into tubes, merged them into one solid and ran the checks above. To give it a stable base, the first version sliced 30% off the bottom to make a flat foot.
Print settings
| Printer | Bambu Lab P2S, 0.4 mm nozzle, textured PEI plate |
|---|---|
| Filament | PLA (PLA Basic profile) |
| Layer height | 0.20 mm |
| Walls | 3 |
| Infill | 15% gyroid |
| Supports | Tree (auto), everywhere |
| Adhesion | 5 mm brim |
| Slice | 2 h 21 min, 21.8 g plus 8.0 g of support (the whole-cube plate, as sliced in Bambu Studio) |
What went wrong
It printed great. The problem was the flat cut. The tesseract is meant to be perfectly symmetrical, and with its base sliced off it looked chopped off and unbalanced. My note at the time: "Even if we need to print more supports it's fine. It's more about the sculptural aspect."
The fix
The cut went to zero and the whole set was re-exported as true cubes, 60.24 mm on each side, with tree supports cradling the bottom frame. I reprinted it, and that version is the one I now sell as a test-printed STL with a ready-to-slice P2S 3MF. "No flat cuts on symmetrical sculptures" is now a standing rule for every generator I run.
Two other pieces from those first weeks: a strapwork pencil holder that printed in 5 h 4 min with no supports and no brim and turned out great, and a 110 mm 24-cell whose model printed well and whose stand did not.
Four models in Bambu Studio
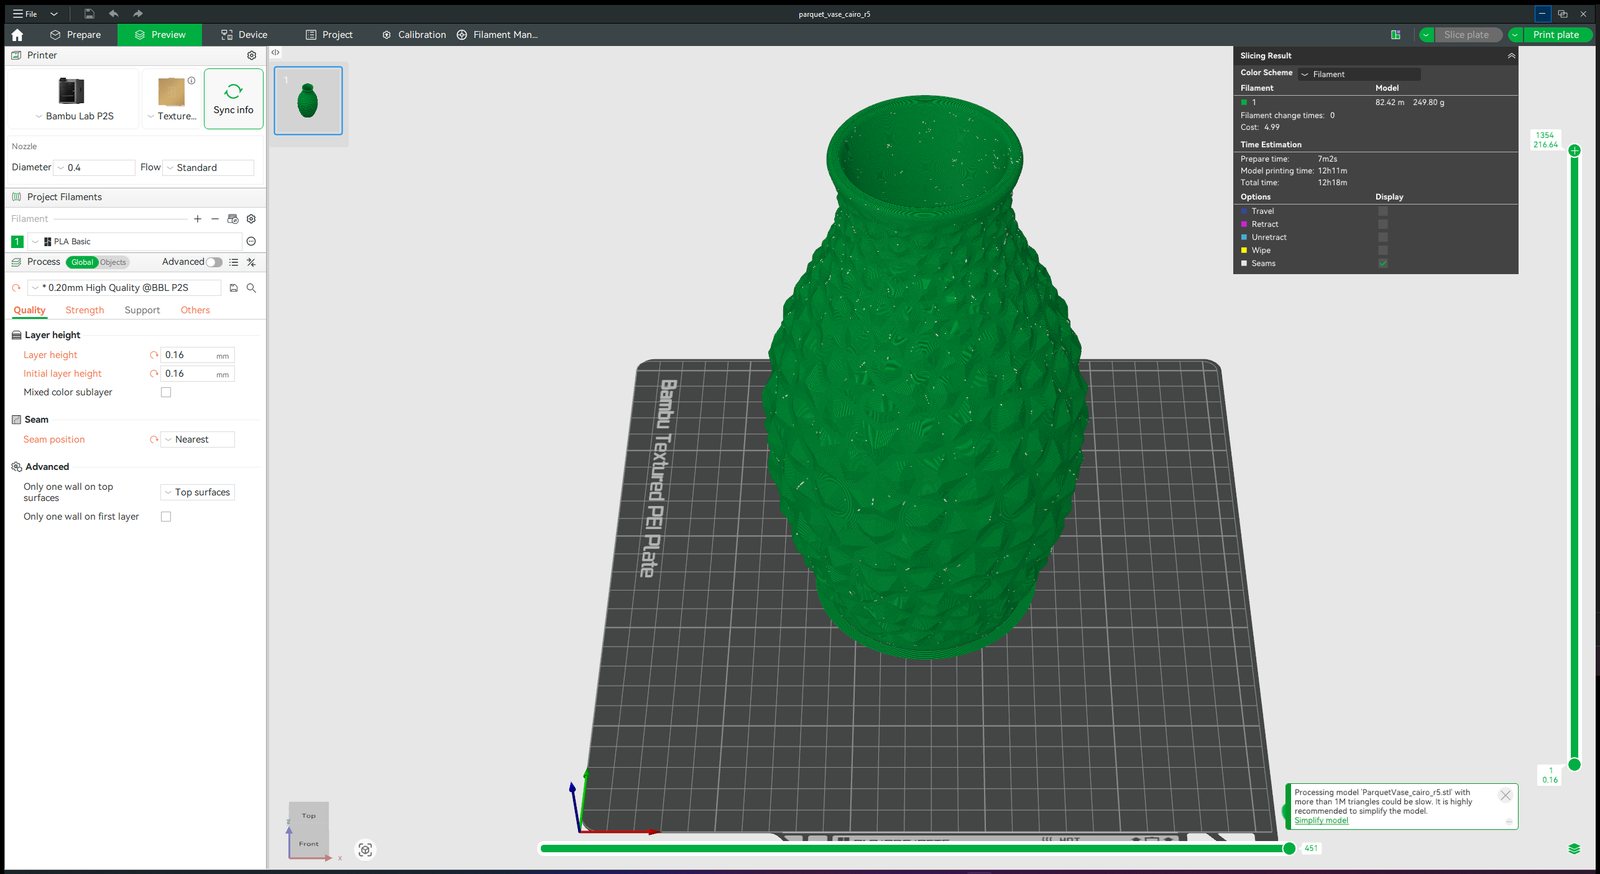
Here are four of my generated models as they open in Bambu Studio, set up for the P2S with PLA Basic. The Prepare view is how the file arrives on the plate. The sliced view shows the slicer's own time and filament estimate.
Parametric vase
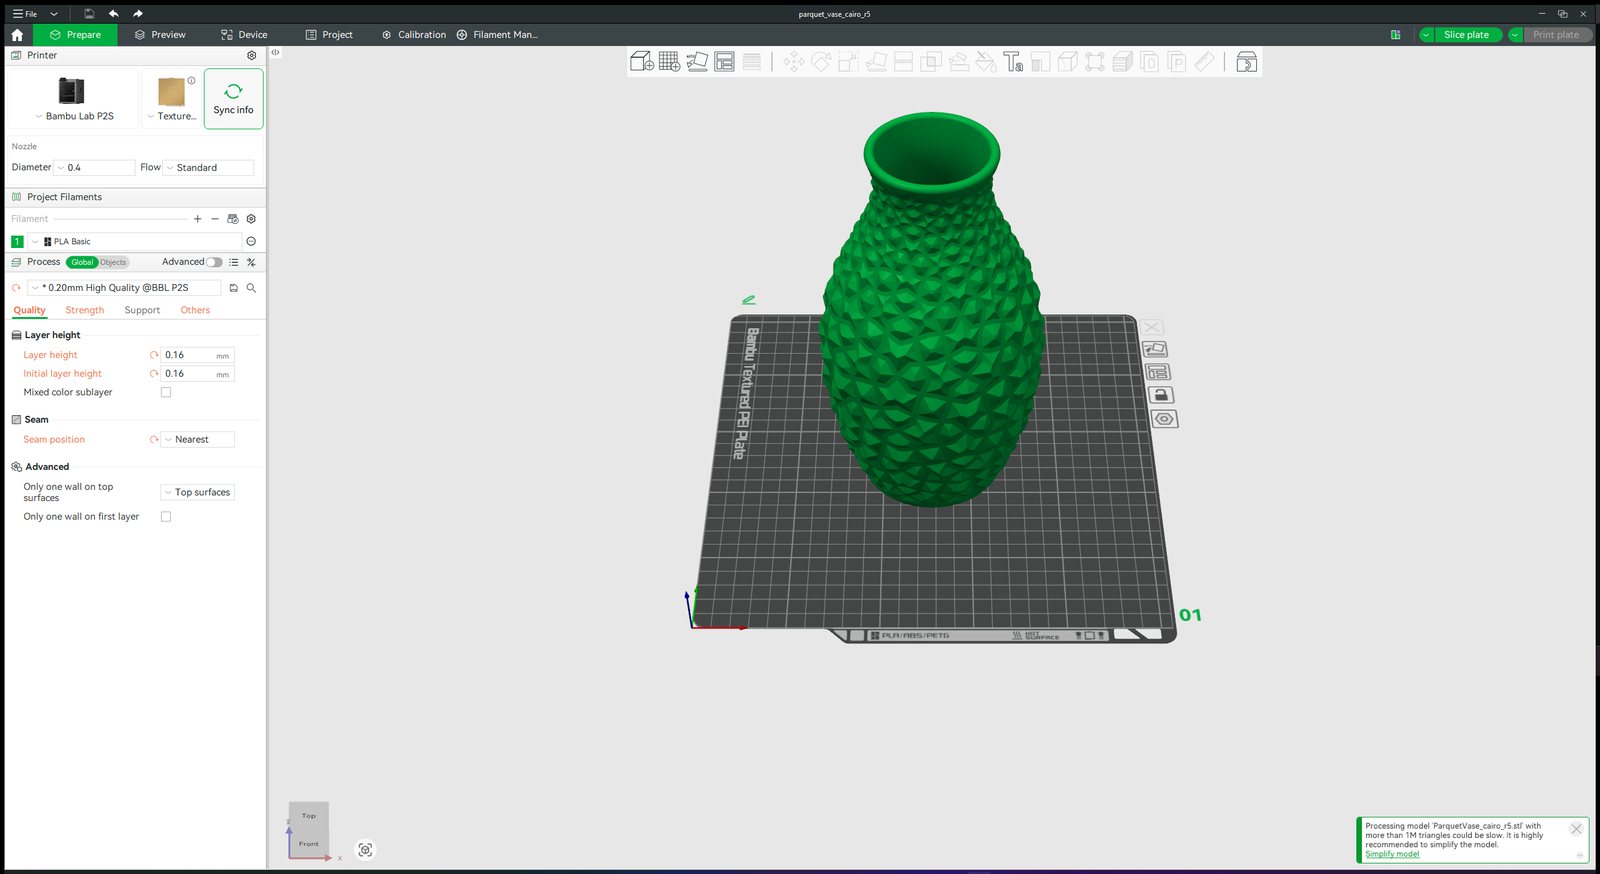
A turned vase with the Cairo tiling swept around it. The ribbons are flat valleys and each face between them is a constant-slope pyramid, so the whole surface stays under a 45° overhang. It stands 216.7 mm tall and prints upright with no supports. The method is parquet deformation, as in Craig Kaplan's Islamic parquet deformations, generated here by my own engine.
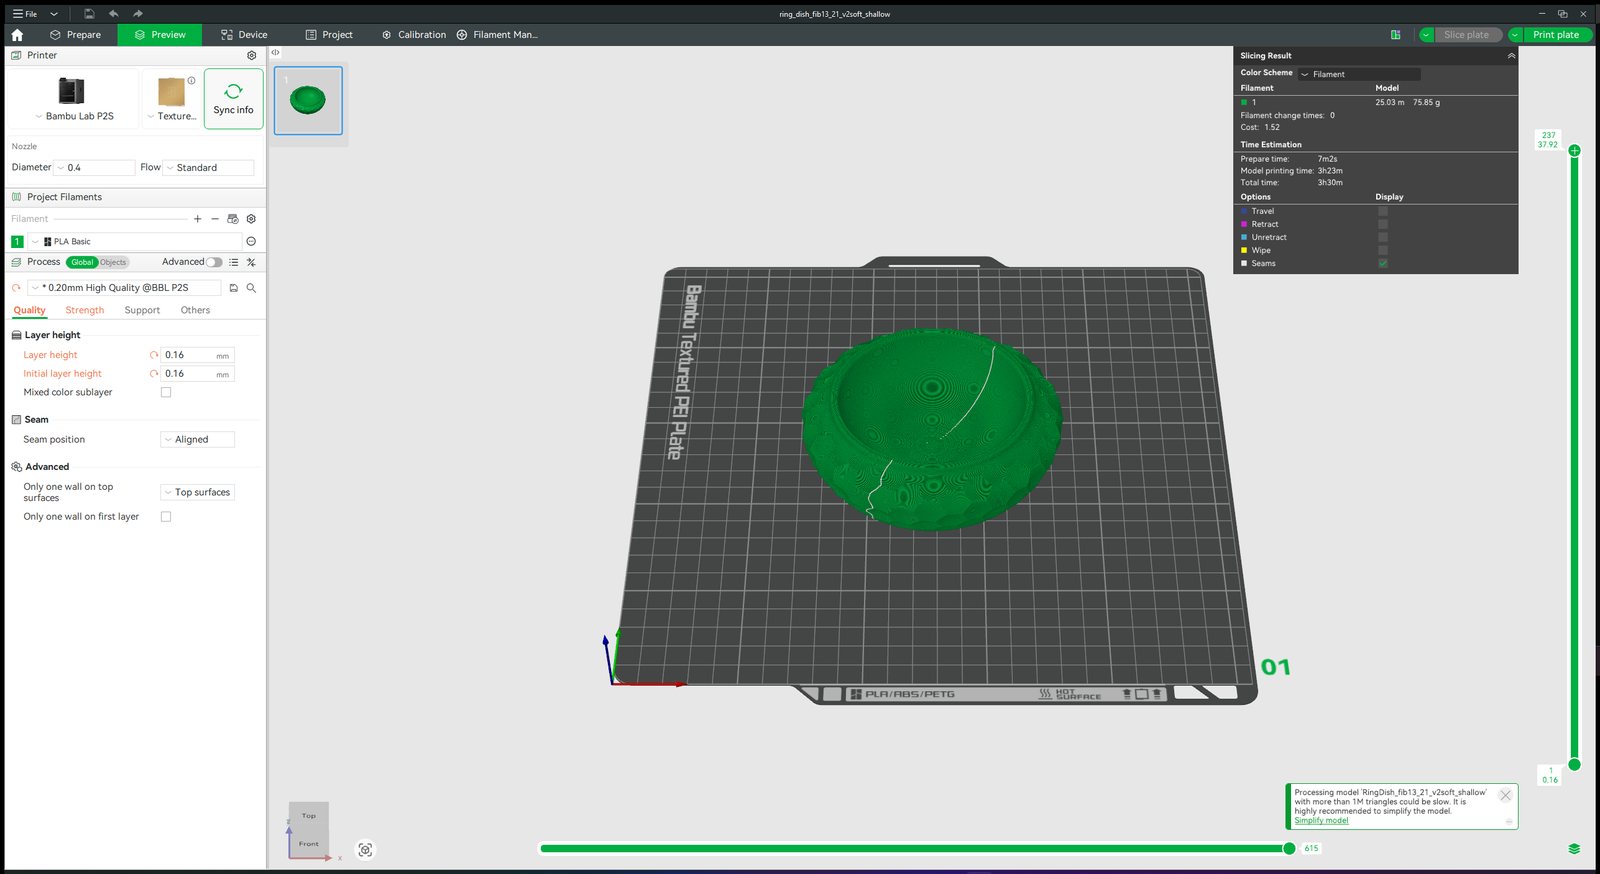
Fibonacci ring dish
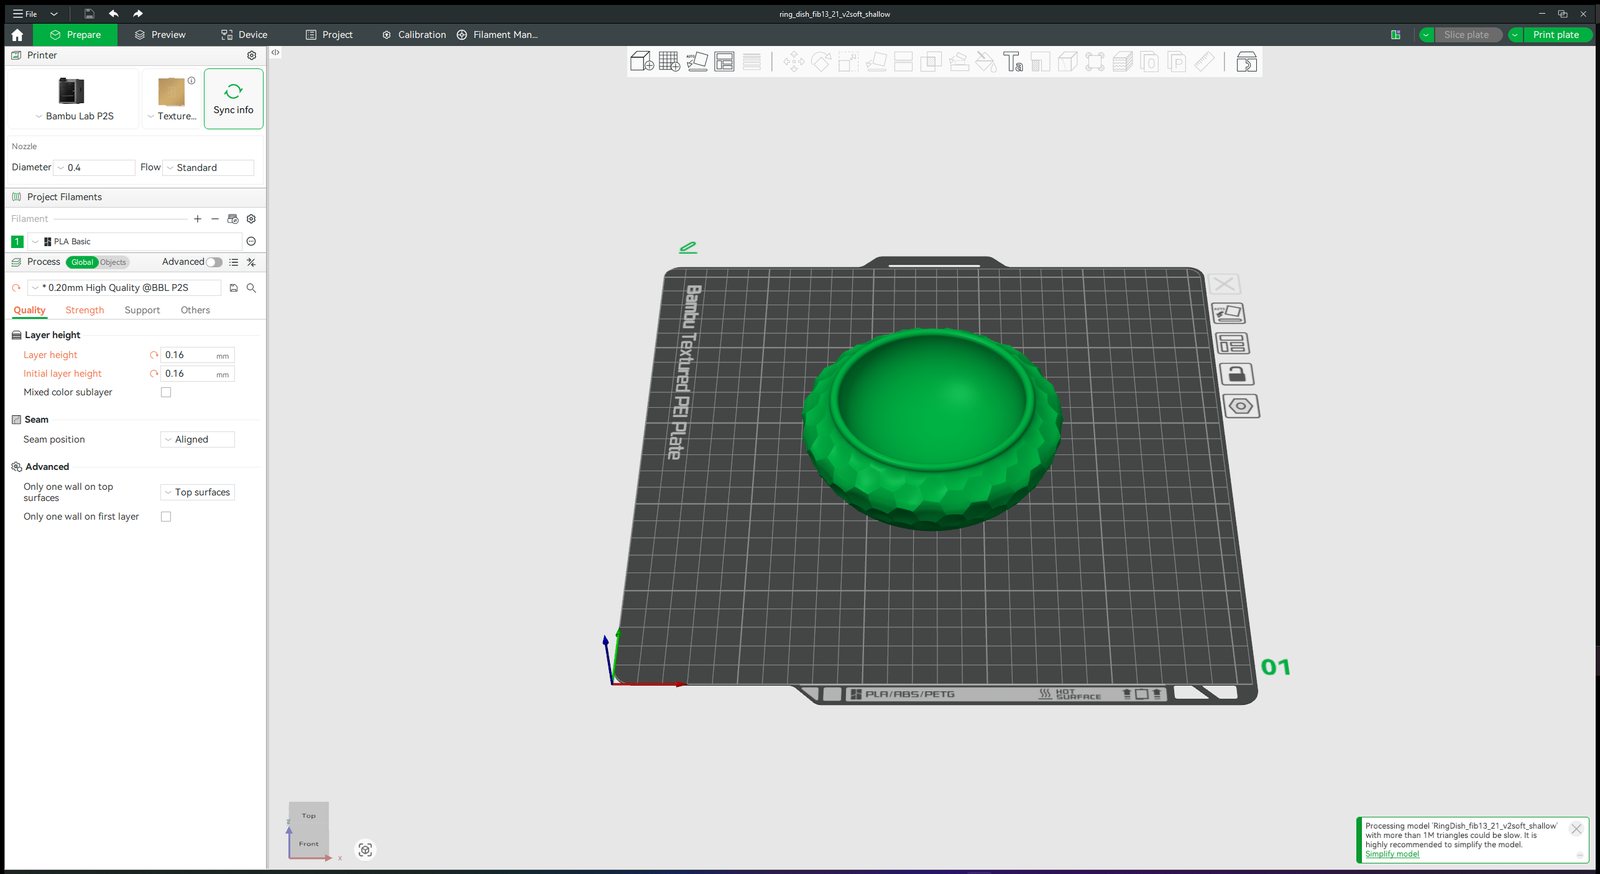
A ring dish with phyllotactic Voronoi dimples: hexagonal scoops arranged in Fibonacci spirals (13, 21 and 34 of them), easing in from the foot and dissolving into a polished half-round lip. It is 114 mm across and 38 mm tall and prints upright without supports. It was inspired by Greg Blanpied's "Zoetrope" turned bowl; the profile and lattice are my own.
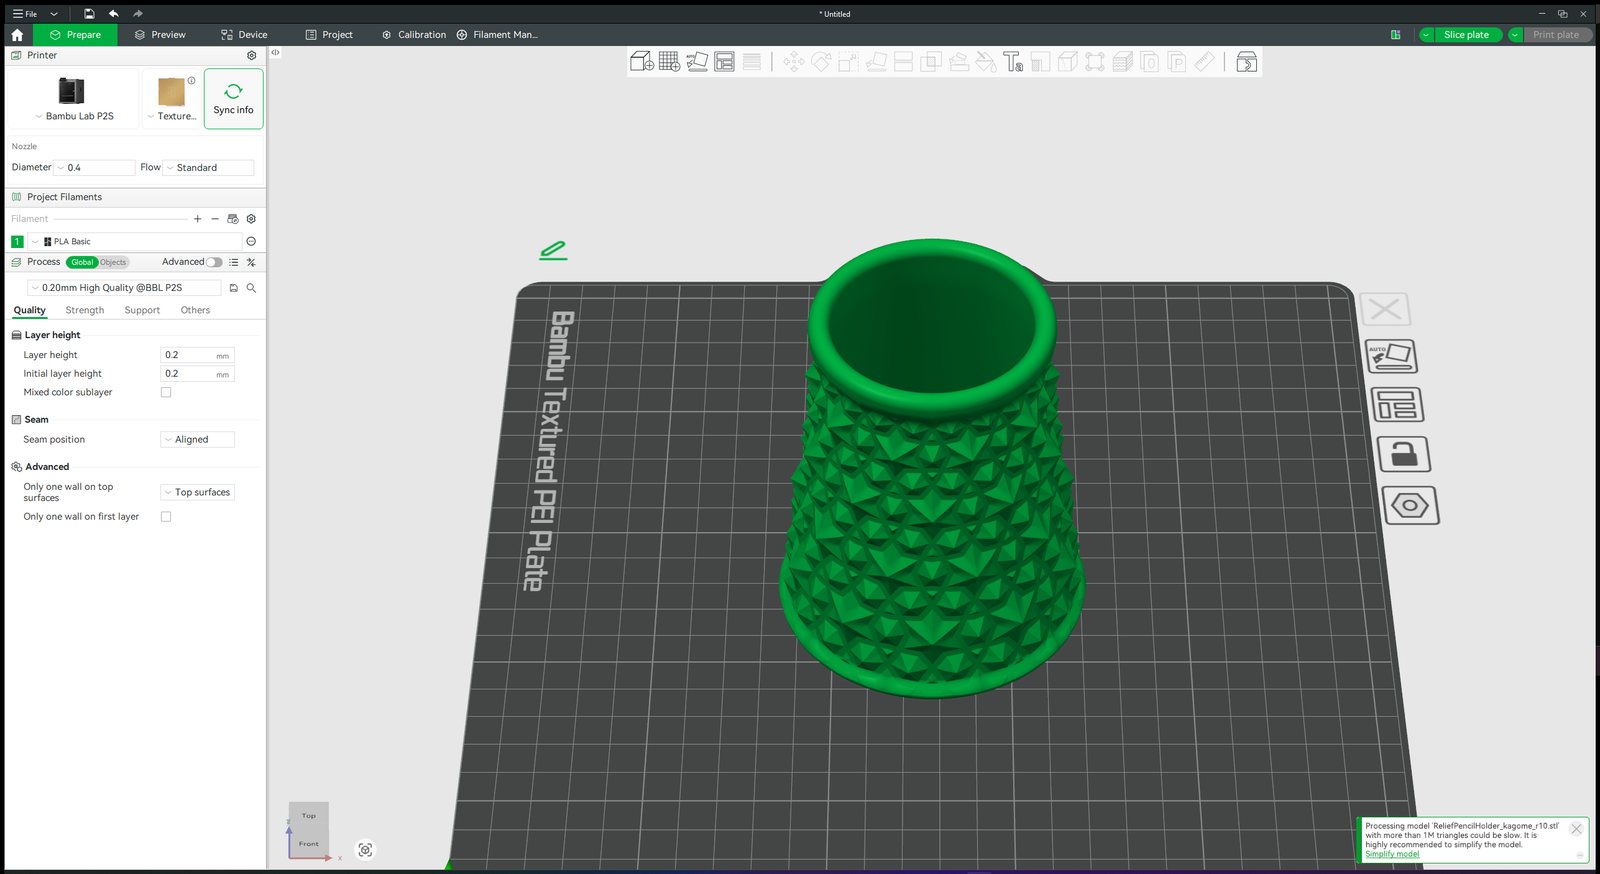
Strapwork pencil holder
The Kagome strapwork pencil holder is a faceted relief wrapped around a tapering body, 105 mm tall. This screenshot is the raw STL opened with Bambu Studio's default 0.20 mm profile, so I haven't quoted a time for it here; the print time above is from my real print.
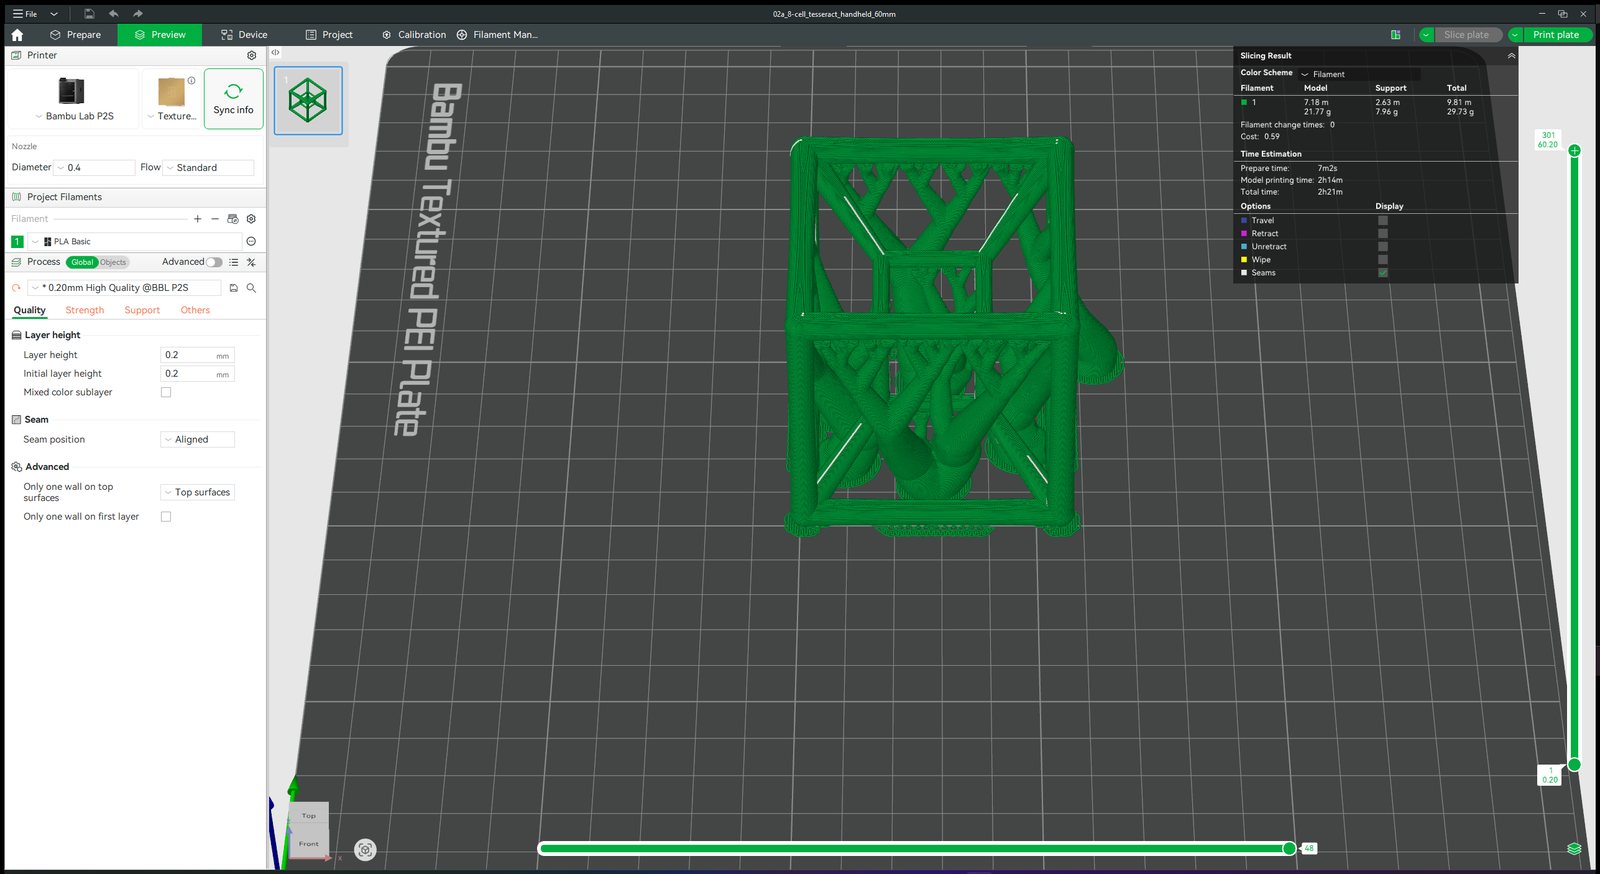
Hypercube
The same 60 mm tesseract from the build log, as the whole cube. The sliced view shows the tree supports cradling the bottom frame: 21.77 g of model and 7.96 g of support, 2 h 21 min in total.
Printer, plate and filament
- Bambu Lab P2S Combo, which includes the AMS. The 256 × 256 mm bed was the deciding factor: my 10 × 10 inch panels need 254 mm, and the P2S has no excluded corner zone eating into the plate.
- 0.4 mm nozzle, the stock size. My generators set minimum tube and wall sizes around it.
- Textured PEI plate. PLA sticks well while printing and releases once the plate cools.
- PLA for everything so far, in grey and white. Geometric pieces are about form, and PLA holds sharp edges and prints with the least fuss.
Limits and a workflow you can copy
AI has not replaced any of the physical knowledge printing needs: test pieces for fits and threads, calibration, knowing how a material behaves, and the judgment of holding the print and deciding whether it is right. Every correction in this article came from me looking at a real object or a real slice.
The workflow I repeat:
- Brief in millimetres. Intent, size, printer bed, nozzle, overhang limit, minimum gaps, output format.
- Ask for a generator, not a model. Have the parameters you will want to change exposed as variables.
- Render in clay and critique. Have the agent look at its own render against the brief before you do.
- Check the exported file. Watertight, manifold, one body, overhangs and gaps, run on the file you will actually slice.
- Slice in the app and read every warning. Use its time and weight, not the AI's estimate.
- Print, hold it, decide. Write the correction into the generator so it never comes back.

Frequently asked questions
Can AI make a 3D printable model?
Yes, but how reliably depends on the method. Text-to-3D and image-to-3D generators give you a mesh quickly, though the detail often lives in textures rather than geometry and the mesh usually needs repair. Asking an AI to write a generator script that builds the model to exact dimensions has been far more reliable for my prints.
Is text-to-3D or image-to-3D better for 3D printing?
Neither is print-ready out of the box. I use generator output as a concept and silhouette reference, check it with a plain clay render, and then build the printable version to spec. A printer only sees geometry, so anything carried by a texture or normal map is lost.
Which AI tool do you use to model in Blender?
I use an AI coding agent connected to Blender over MCP, which lets it inspect the scene, run Python and render previews. For printable parts it writes Python generators using libraries such as numpy, trimesh and manifold3d, and I review every render and slice.
Can AI choose my slicer settings?
It is a useful starting point, but check every suggestion against your slicer. In my prints it has suggested a setting that exists in a different slicer, overstated how much infill a stand needed and underestimated a print by more than two hours. The slicer preview and estimate are the authority.
What printer do you use?
A Bambu Lab P2S Combo with the AMS, a 0.4 mm nozzle and the textured PEI plate, printing in PLA. The 256 mm bed fits my 10 × 10 inch wall panels with about a millimetre to spare.
Can I download the files shown here?
The 60 mm tesseract is available as a test-printed STL with a ready-to-slice Bambu P2S 3MF, and the six regular polychora are available as a print set. The other designs in this article are not released as files.
Studio dispatches
New work, new writing — straight to you
Occasional letters from the studio. No spam, unsubscribe anytime.